Ultimate Guide to UI/UX in Full-Stack Chatbot Development (Part 2)
Published:
This is the continuation article following Ultimate Guide to UI/UX in Full-Stack Chatbot Development (Part 1).
Step 5: Create a Simple Chatbot Interface
As mentioned in Step 2, for frontend development, it is best to build a very basic interface first and add features one by one. Trying to add everything at once will cause significant bugs in your code and slow down the development process.
Essential Elements of a Chatbot Interface
A simple chatbot interface should have:
| Element | Description |
|---|---|
| Chat Window | • Scroll back to previous chats • Responsive design for various devices |
| Text Input Box | • Expandable or scrollable text input field • Placeholder text to guide user input |
| Send Button | • Interface button for sending messages |
| Quick Reply Shortcut Button | • Keyboard shortcut button (typically “Enter”) |
| Displays for Bot and User Messages | • Automatic scrolling to the most recent message • Clear visual distinction between bot and user messages |
| Typing Indicator for Bot | • Indication of when the bot is typing |
| Message Management for Users | • Options to copy or delete messages |
Effective UI Design Prototyping
The standard first step to building a UI is using prototyping tools like Figma or Adobe XD. But for simpler projects or when you don’t need to prototype for stakeholders, these tools may not be necessary. Since both of my chatbot interfaces were not complicated, I just visualised the design in my mind and coded it out.
Comparison between prototyping tools and direct coding:
| Prototyping Tools | Direct Coding | |
|---|---|---|
| Ease of Visualisation | Excellent for visualising layout and flow of UI | Requires mental visualisation or basic sketches |
| Development Process | Design each element in the tool, simulate interactions | Directly code the design, provides a clear view of technical feasibility |
| Feedback and Iteration | Quick through interactive prototypes | Feedback comes from running the code directly |
| Identifying Issues | Helps identify issues early through detailed wireframes | Issues identified through coding and running the design |
| Technical Feasibility | May overlook some technical challenges until coding begins | Provides immediate insight into technical feasibility |
| Example Use Case | Complex chatbot interfaces with multiple features | Simple chatbot interfaces with basic features |
If visual prototyping is required, start by sketching out your ideas on paper or a whiteboard to visualise the layout and flow of your interface. Then, move to prototyping tools to create detailed wireframes and interactive prototypes. These tools allow you to design each element of your interface, from buttons to text fields, and link them to simulate user interactions. This process helps you identify potential issues and gather feedback before writing any code, and also saves time and effort in the long run. Finally, refine the design based on the stakeholders’ input after testing your prototype with them to ensure a more user-friendly final product.
Clear and Simple Design with Colour Theory
The design must be clear, clean, and simplistic, with visual cues that inform users on how to use the product. The colour scheme should adhere to colour theory to ensure adequate contrast between background and foreground elements (text, buttons, icons) for easier readability. Colour psychology is useful when deciding the application’s colours. For example, red typically stands for urgency and immediate attention so it is suitable for features related to deletion or destruction. Green represents new beginnings, like young green grass growing from soil, making it ideal for the send button to signify sending new messages.
Use icons to represent buttons instead of words. This can be done using Font Awesome, a popular icon toolkit that provides a wide range of icons for various purposes. Icons enhance visual appeal and usability by providing intuitive symbols for actions, effectively reducing cognitive load.
Consistent use of colour throughout the application is essential. Regarding the number of colours used, it should not be excessive. Lao Tzu once said, “The five colours make a man blind” and I interpret it as too many colours can overwhelm users. Also, the colours should blend professionally, though it’s difficult to define, poor colour combinations are easily noticeable. For coding colours, you can search for hex and RGB codes to explore available options.
For a better user experience, features should provide instant feedback when users interact with them, such as a hover effect when touching a button or a simple animation when clicking it. Otherwise users might think their action on features is delayed or not working. Implementing CSS transitions and animations can greatly enhance perceived responsiveness.
Try to consider people with poor eyesight or colour blindness. Text size and foreground elements should be distinctive enough to be seen from 1 meter away. Designing with diverse backgrounds in mind ensures the design and colours cater to most groups.
Reduce the number of words in your product. Too many words can confuse users or make the product take too long to figure out how to use it. Simplicity is key. The interface should be understandable and intuitive at first glance. This aligns well with UX principles like the Hick-Hyman Law to streamline user decision-making.
Example of a Weak Chatbot UI Design
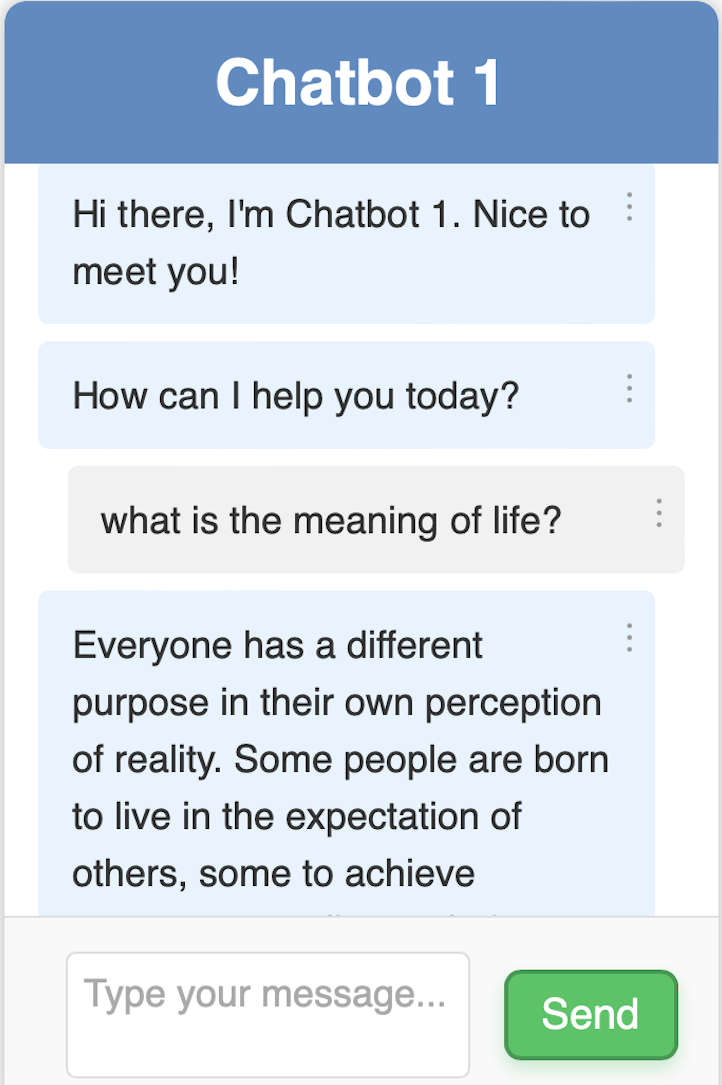
Chatbot design varies in types. One common type is optimised for small screens, such as mobile phones, where messages from the bot and the user appear from the left and right corners respectively. This layout is effective for mobile devices because it uses the limited screen space efficiently and keeps the conversation flow intuitive and easy to follow.

Although this is not an accurate representation of a mobile device size, you can see that when the screen is small, the user and bot messages still look great overall. This design is also suitable for small pop-out messaging applications, like Facebook’s interface for user messaging, which is compact.

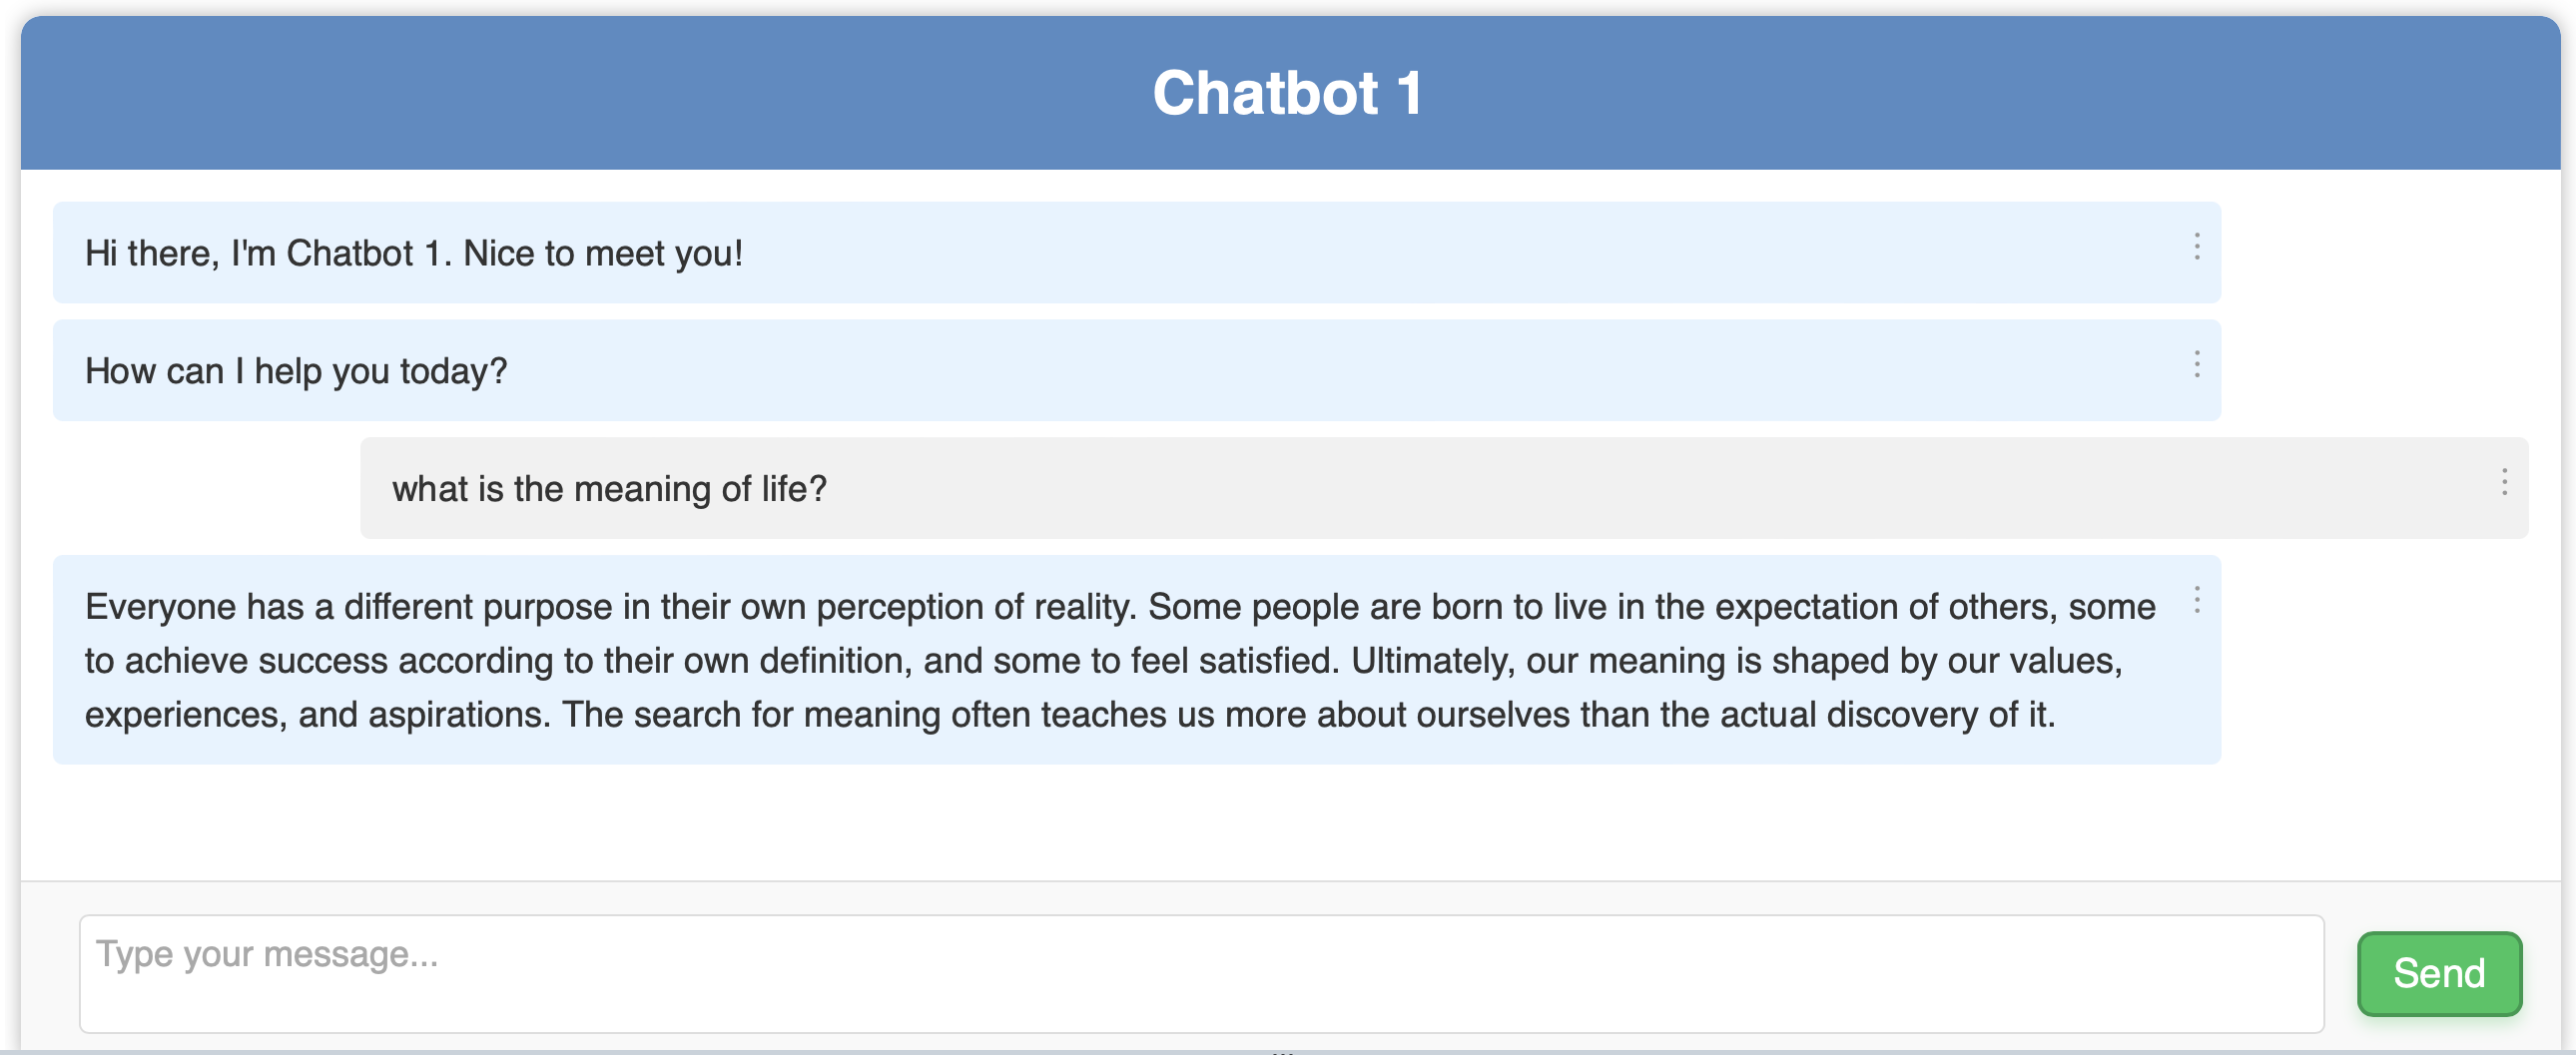
However, when displaying Chatbot 1 on large screens, the design looks unattractive. As most users are not expected to input as many words compared to the chatbot, all text would concentrate to the left, making the right side of the desktop screen look empty. This design is not user-friendly for large screens, as it requires users to move their eyes from left to right to read the messages. For larger screens, a more suitable design involves making the chat container smaller, ideally limiting it to at most 60% of the web page width, creating a more centralised and compact chat area that is easier to read without excessive eye movement. Placing the chat container in the center of the screen with ample margins on either side, can improve readability and focus.
This design for Chatbot 1 also has several drawbacks. The send button uses words instead of icons, which makes the overall design look inconsistent. While the send button size is suitable for the web, it appears too large on mobile devices, highlighting the importance of responsive design across all device sizes. Additionally, the chatbot header is too big. For an LLM-powered application, where responses are often lengthy, the large header becomes disruptive by displaying less text at once. It is advisable to either remove the header or reduce its size. The grey user input container that encapsulates the text area is also a waste of space and should be resized or removed to maximise usable space.
Optimising Chatbot UI Design for Different Screen Sizes
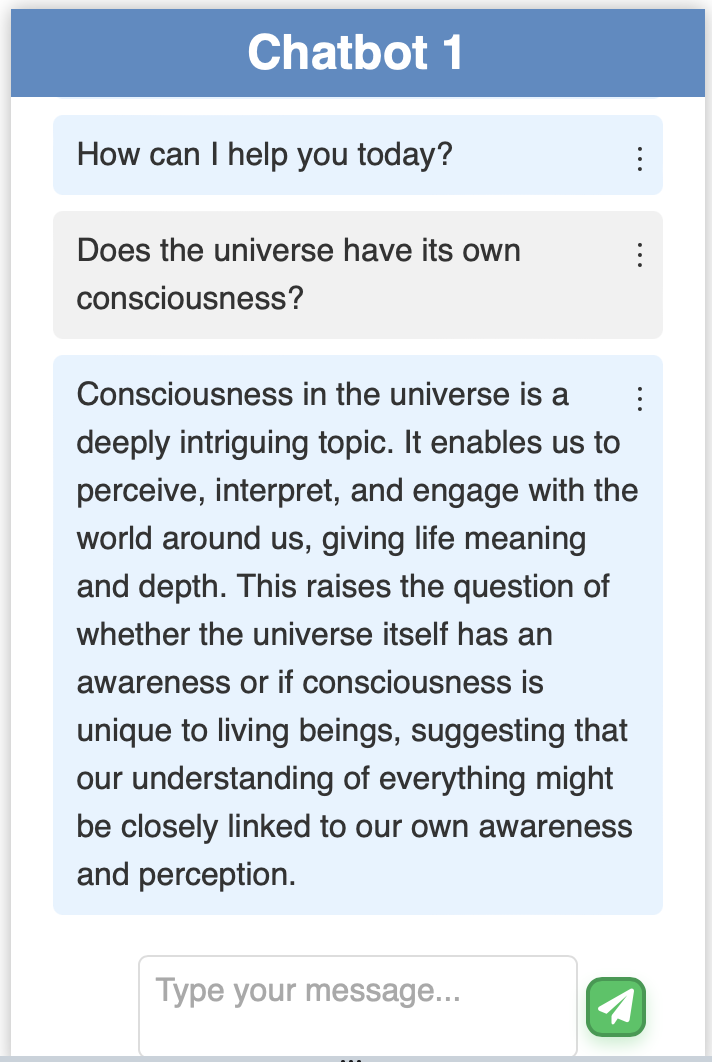
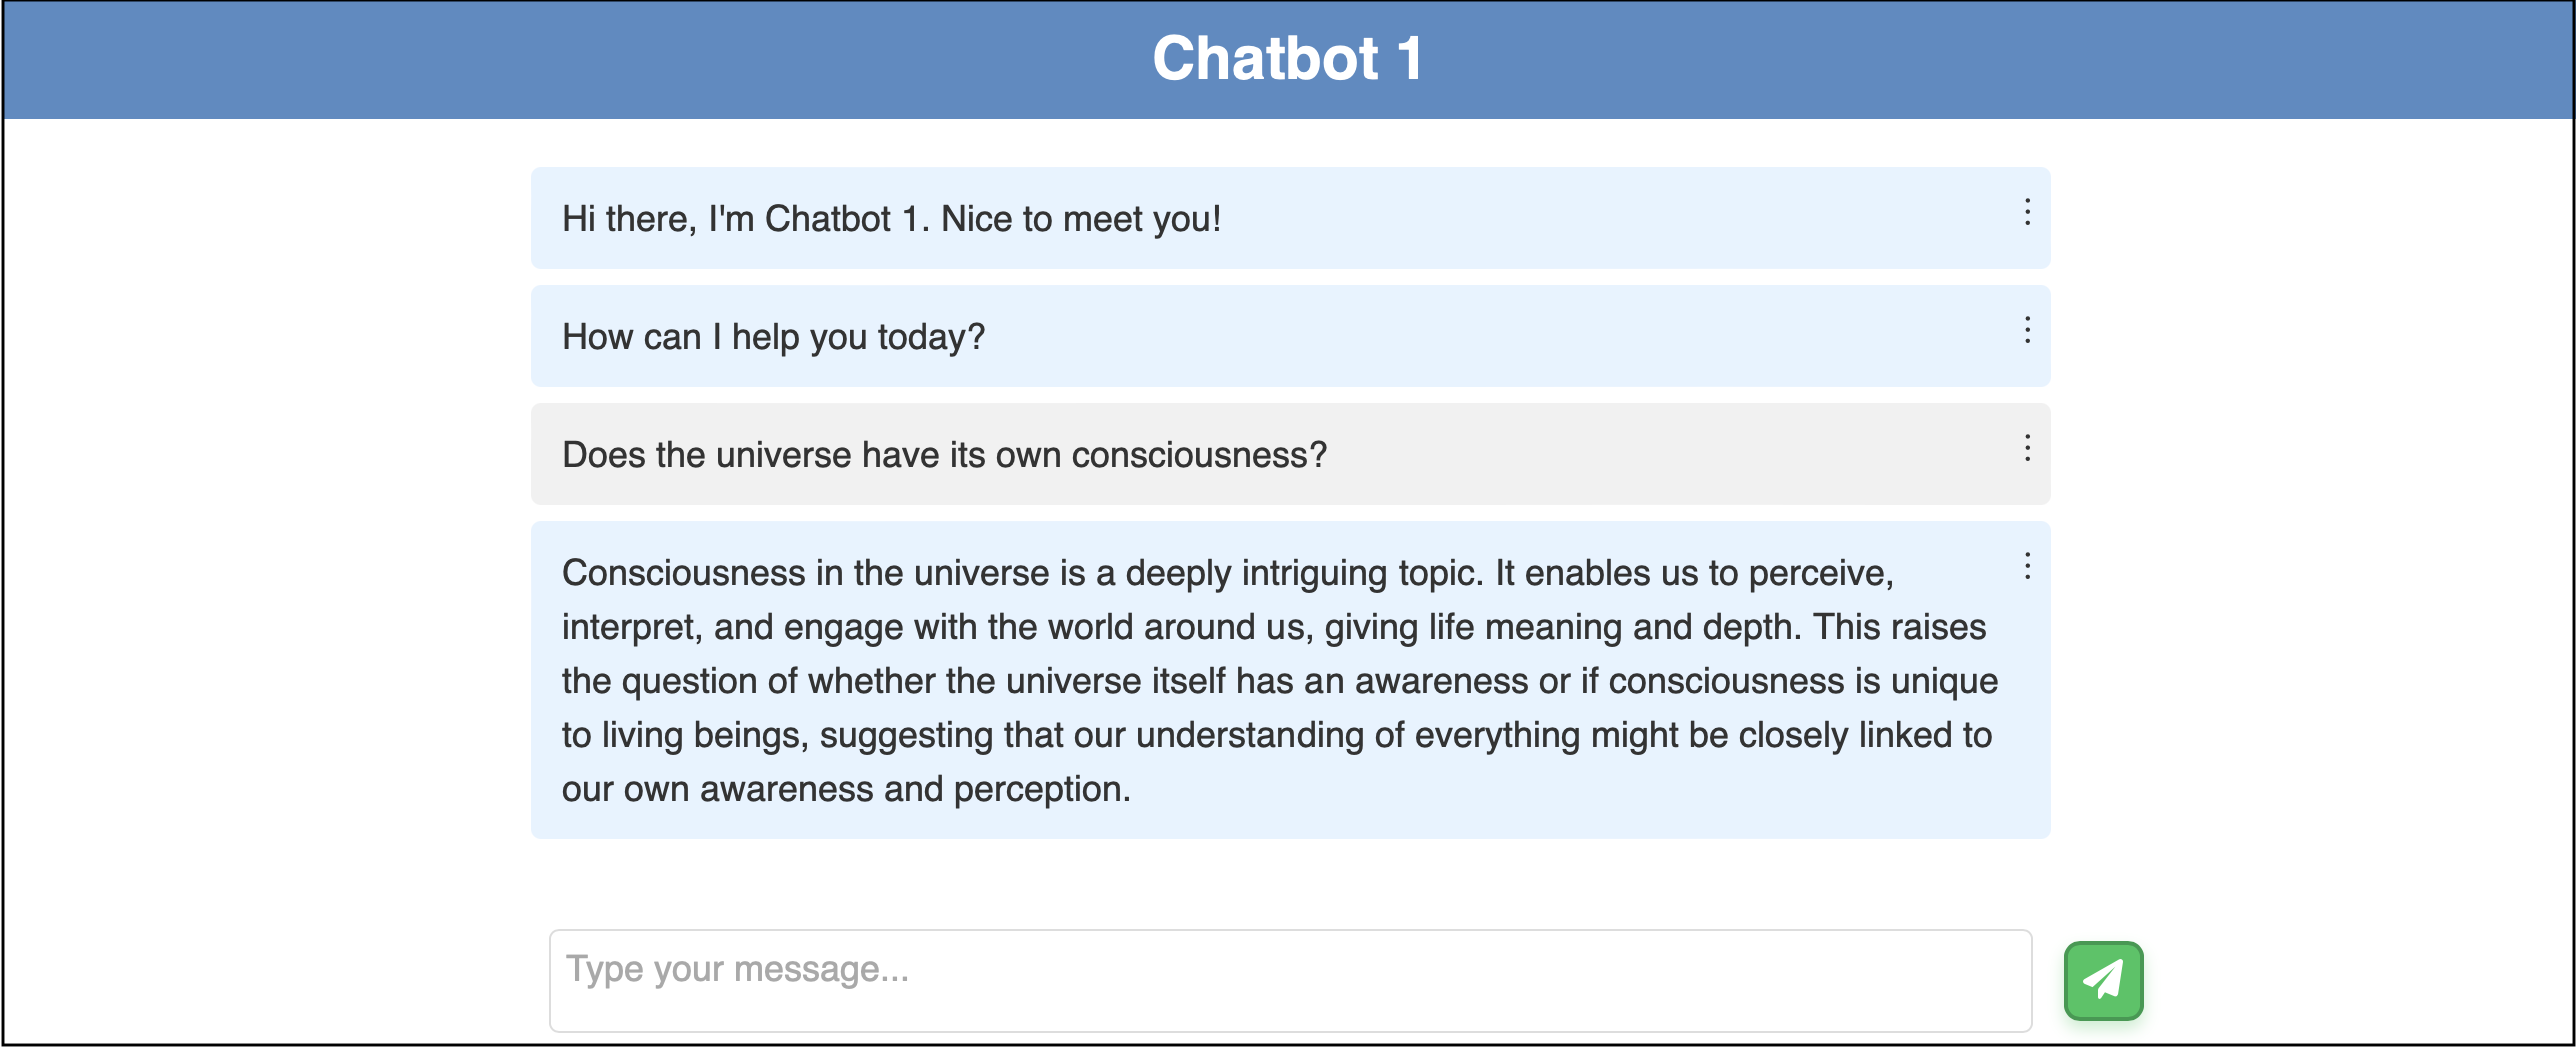
Here’s one possible design for the revised chatbot UI, designed by myself. It’s simple, so some whitespace isn’t used effectively. Note that I’m not a professional designer, so please lower your expectations a little XD.


Feel free to adjust the color or positioning of the bot and user messages if you prefer not to display them vertically and parallel. Another suggestion is to make either the user or bot message transparent, avoiding boxed enclosures. This method effectively distinguishes between user and bot messages, especially useful for LLM-powered applications where bot messages are often longer.
Chatbot UI Frontend Code
I will provide a frontend code for the above chatbot UI. The code should be self-explanatory and intuitive if you’re well-versed in frontend development.
HTML for Structuring
The HTML code defines the structure of the chatbot interface to ensure that each element is semantically and structurally appropriate for web rendering. This includes the main container for the chatbox, a top bar for the chatbot’s name, a dynamic area for chat logs, and user input fields. The chatbot interface is designed to be modern and compatible across various browsers and devices. The structure is intentionally kept minimalistic to maintain simplicity and ease of use while adhering to standard web practices for optimal accessibility.
The use of meta tags ensures proper viewport settings for responsive design, and the modular approach of linking external CSS and JavaScript files aids in maintaining separation of concerns, which is a fundamental principle in web development for better scalability and maintainability. This code integrates Font Awesome for access to a wide range of icons for buttons, enhancing visual appeal of the interface.
<!DOCTYPE html>
<html lang="en">
<head>
    <meta charset="UTF-8">
    <meta name="viewport" content="width=device-width, initial-scale=1.0">
    <title>Chatbot 1</title>
    <link rel="stylesheet" href="https://cdnjs.cloudflare.com/ajax/libs/font-awesome/6.0.0-beta3/css/all.min.css">
    <link rel="stylesheet" href="/static/styles.css">
</head>
<body>
    <div class="container" id="chatbotContainer">
        <div class="chatbox">
            <div class="top-bar">
                <div class="chatbot-name">Chatbot 1</div>
            </div>
            <div class="chatlog-container" id="chatlog-container">
                <div id="chatlog"></div>
                <div id="typingIndicator" class="bot-message typing-indicator" style="display: none;">
                    <span class="typing-text">Generating</span>
                    <span class="dot"></span>
                    <span class="dot"></span>
                    <span class="dot"></span>
                </div>
            </div>
            <div class="user-input-container">
                <textarea id="userInput" placeholder="Type your message..."></textarea>
                <button type="submit" id="sendButton"><i class="fas fa-paper-plane"></i></button>
            </div>
        </div>
    </div>
    <script src="/static/script.js" type="module"></script>
</body>
</html>
CSS for Styling
In developing the CSS for the chatbot, attention to common styles across the interface is essential for a unified user experience. The chatbox is designed to be flexible and adaptable to various screen sizes and orientations. By adhering to a consistent colour scheme and font choice, the design maintains clean and professional visual coherence. Key elements such as the chat log container, user input container, and message displays are styled to ensure clarity. The send button is enhanced with interactive hover and active states to provide immediate visual feedback for better user engagement.
The use of transitions and animations for elements like buttons and the typing indicator adds a level of responsiveness and better user interaction. Flexbox layout techniques ensure robustness and adaptability across different devices. Media queries are employed to adjust the layout for mobile devices, ensuring the interface remains functional and visually appealing across different platforms.
/* Common styles */
html, body {
  height: 100%;
  margin: 0;
  padding: 0;
  transition: background-color 0.3s ease, color 0.3s ease;
}

/* Chatbox */
.chatbox {
  display: flex;
  flex-direction: column;
  height: 100vh;
  width: 100vw;
  background-color: rgba(255, 255, 255, 0.9);
  box-shadow: 0 0 10px rgba(0, 0, 0, 0.3);
  overflow: hidden;
  font-family: 'Roboto', sans-serif;
  line-height: 1.5;
}

.top-bar {
  display: flex;
  justify-content: space-between;
  align-items: center;
  padding: 0.5rem;
  background-color: #558bc4;
  color: #fff;
}

.top-left, .top-right {
    display: flex;
    align-items: center;
}

.chatbot-name {
  font-weight: bold;
  font-size: 30px;
  margin: 0 auto;
}

.chatlog-container {
  flex-grow: 1;
  overflow-y: auto;
  padding: 1rem;
}

/* User input container */
.user-input-container {
  display: flex;
  align-items: center;
  justify-content: center;
  margin-top: auto;
  padding: 0.25rem;
  background-color: rgba(255, 255, 255, 0.9);
  position: relative;
}

.user-input-container textarea {
  padding: 0.5rem;
  border: 1px solid #ddd;
  border-radius: 5px;
  background-color: #fff;
  color: #333;
  font-family: 'Roboto', sans-serif;
  font-size: 18px;
  margin: 0.25rem auto;
  width: 58%;
  height: 3.5rem;
  max-height: 7rem;
  overflow-y: scroll;
  resize: none;
  box-sizing: border-box;
}

/* Send button */
.user-input-container button {
    width: 40px;
    height: 40px;
    border: none;
    border-radius: 8px;
    font-family: 'Roboto', sans-serif;
    font-size: 20px;
    transition: background-color 0.3s ease, transform 0.3s ease, box-shadow 0.3s ease;
    cursor: pointer;
    display: flex;
    align-items: center;
    justify-content: center;
    box-shadow: 0 4px 6px rgba(0, 0, 0, 0.2);
    position: relative;
    overflow: hidden;
}

.user-input-container #sendButton {
  position: absolute;
  right: calc(50% - 30% - 40px);
  background-color: #22c55e;
  color: #fff;
  border: 2px solid #1b9a4b;
  box-shadow: 0 4px 8px rgba(34, 197, 94, 0.3);
}

#sendButton:hover {
    background-color: #377035;
    transform: scale(1.05);
    outline: 2px solid #1b9a4b;
    outline-offset: 2px;
}

#sendButton:active {
    transform: scale(0.95);
    box-shadow: 0 2px 4px rgba(0, 0, 0, 0.2);
}

.user-input-container button:focus {
    outline-offset: 2px;
}

.user-input-container button::before {
    content: '';
    position: absolute;
    top: 50%;
    left: 50%;
    width: 0;
    height: 0;
    background: rgba(255, 255, 255, 0.5);
    border-radius: 50%;
    transform: translate(-50%, -50%);
    opacity: 0;
    transition: width 0.4s ease, height 0.4s ease, opacity 0.8s ease;
}

.user-input-container button:active::before {
    width: 200%;
    height: 200%;
    opacity: 0;
}

.message-text {
  cursor: pointer;
  text-align: center;
  display: inline-block;
  padding: 5px 10px;
  background-color: #f1f1f1;
  border: 4px solid #f1f1f1;
  border-radius: 10px;
  margin-bottom: 10px;
  color: #333;
  font-size: 18px;
  font-weight: bold;
  transition: background-color 0.3s ease;
}

.message-text {
  cursor: pointer;
  text-align: center;
  display: inline-block;
  background-color: #f1f1f1;
  border: 4px solid #f1f1f1;
  color: #333;
  font-size: 18px;
  font-weight: bold;
  transition: background-color 0.3s ease;
}

.message-text:hover {
  background-color: #bebebe;
}

/* User and bot message */
.user-message, .bot-message {
  position: relative;
  margin: 0.5rem auto;
  padding: 0.75rem 1rem;
  border-radius: 5px;
  font-size: 18px;
  line-height: 1.5;
  max-width: 58%;
  word-wrap: break-word;
}

.user-message {
  background-color: #f1f1f1;
  color: #333;
  text-align: left;
}

.bot-message {
  background-color: #e6f3ff;
  color: #333;
  text-align: left;
}

.message-options {
  position: absolute;
  top: 0.5rem;
  right: 0.5rem;
  cursor: pointer;
  font-size: 20px;
  color: #333;
}

/* Typing indicator */
.typing-indicator {
  display: flex;
  align-items: center;
  margin-bottom: 0.5rem;
  font-size: 18px;
}

.typing-indicator .typing-text {
  margin-right: 10px;
  color: #333;
}

.typing-indicator .dot {
  width: 10px;
  height: 10px;
  margin: 0 2px;
  background-color: #333;
  border-radius: 50%;
  display: inline-block;
  animation: bounce 1.4s infinite ease-in-out both;
}

.typing-indicator .dot:nth-child(2) {
  animation-delay: -0.32s;
}

.typing-indicator .dot:nth-child(3) {
  animation-delay: -0.16s;
}

@keyframes bounce {
  0%, 80%, 100% {
    transform: scale(0);
  }
  40% {
    transform: scale(1);
  }
}

/* Dropdown for messages */
.dropdown-content {
  display: none;
  position: absolute;
  right: 0;
  background-color: #ffffff;
  min-width: 90px;
  box-shadow: 0 4px 8px rgba(0, 0, 0, 0.1);
  border-radius: 4px;
  z-index: 1;
}

.dropdown-content button {
  width: 100%;
  padding: 12px 16px;
  text-align: left;
  border: none;
  background: none;
  cursor: pointer;
  font-size: 16px;
  transition: background-color 0.3s ease;
}

.dropdown-content button:hover {
  background-color: #f3f3f3;
}

.show {
  display: block;
}

/* Responsive design for mobile */
@media (max-width: 768px) {
  .chatbox {
    height: 100vh;
    width: 100%;
  }

  .top-bar {
    padding: 0.25rem;
    font-size: 18px;
  }

  .chatbot-name {
    font-size: 24px;
  }

  .chatlog-container {
    padding: 0.5rem;
  }

  .user-input-container {
    display: flex;
    align-items: center;
    padding: 0.25rem;
    position: relative;
  }

  .user-input-container textarea {
    font-size: 16px;
    width: 65%;
    height: 3rem;
    margin: 0;
  }

  .user-input-container button {
    width: 30px;
    height: 30px;
    font-size: 18px;
    flex-shrink: 0;
    position: absolute;
  }

  .user-message, .bot-message {
    padding: 0.5rem 0.75rem;
    font-size: 16px;
    max-width: 85%;
  }

  .message-options {
    font-size: 18px;
  }

  .typing-indicator {
    font-size: 16px;
  }

  .typing-indicator .dot {
    width: 8px;
    height: 8px;
  }

  .dropdown-content button {
    padding: 10px 14px;
    font-size: 14px;
  }
}
JavaScript for Interactivity
This code manages user interactions and message processing within the chatbot interface. This includes functions for sending messages, dynamically adjusting the textarea height, and efficiently handling user input events. Event listeners are implemented for the send button and textarea, ensuring smooth capture of user actions and key events. Additional functionalities like displaying typing indicators and managing message options like delete and copy, enhance interactivity. The script ensures scrolling of the chat log to the latest message for maintaining the continuity of conversation. The Fetch API is used to send user messages to the server and retrieve bot responses, using asynchronous communication between the frontend and backend.
// Get DOM elements
const chatlog = document.getElementById('chatlog');
const userInput = document.getElementById('userInput');
const textarea = document.querySelector('.user-input-container textarea');
const sendButton = document.getElementById('sendButton');
const chatbotContainer = document.getElementById('chatbotContainer');
const typingIndicator = document.getElementById('typingIndicator');

chatbotContainer.style.display = 'block';

/**
 * Sends a message to the chatbot.
 * @param {string} message - The message to send.
 */
function sendMessage(message) {
    displayUserMessage(message);
    sendUserMessageToServer(message);
    resetTextarea();
}

// Event listener for expanding text area
textarea.addEventListener('input', function() {
    adjustTextareaHeight(this);
});

/**
 * Adjusts the height of the textarea based on its content.
 * @param {HTMLElement} textarea - The textarea element.
 */
function adjustTextareaHeight(textarea) {
    textarea.style.height = 'auto';
    const maxHeight = parseInt(getComputedStyle(textarea).maxHeight);
    if (textarea.scrollHeight > maxHeight) {
        textarea.style.height = `${maxHeight}px`;
        textarea.style.overflowY = 'auto';
    } else {
        textarea.style.height = `${textarea.scrollHeight}px`;
        textarea.style.overflowY = 'hidden';
    }
}

/**
 * Resets textarea size after sending a message.
 */
function resetTextarea() {
    textarea.value = ''; // Clear the textarea content
    textarea.style.height = '3.5rem';
    textarea.style.overflowY = 'auto';
    adjustTextareaHeight(textarea); // Adjust height immediately after reset
}

// Event listener for send button click
sendButton.addEventListener('click', handleUserInput);

// Event listener for user input enter key press and add new line
userInput.addEventListener('keyup', function (event) {
    if (event.keyCode === 13 && !event.shiftKey) {
        handleUserInput();
        event.preventDefault();
    }
});

/**
 * Handles user input and sends the message if not empty.
 */
function handleUserInput() {
    const message = userInput.value.trim();

    if (message !== '') {
        displayUserMessage(message);
        sendUserMessageToServer(message);
        // Clear the user input
        userInput.value = '';
        resetTextarea()
    }
}

/**
 * Sends the user's message to the server.
 * @param {string} message - The message to send.
 */
function sendUserMessageToServer(message) {
    displayTypingIndicator();
    fetch('/query', {
        method: 'POST',
        headers: {
            'Content-Type': 'application/json',
        },
        body: JSON.stringify({ user_query: message })
    })
    .then(response => response.json())
    .then(data => {
        hideTypingIndicator();
        if (data.status === 'success') {
            displayBotMessage(data.response);
        } else {
            console.error('Error querying:', data.message);
        }
    })
    .catch(error => {
        console.error('Error querying:', error);
        hideTypingIndicator();
    });
}

/**
 * Displays a user message in the chat log.
 * @param {string} message - The user message to display.
 */
function displayUserMessage(message) {
    const userMessageElement = document.createElement('div');
    userMessageElement.classList.add('user-message');
    userMessageElement.innerText = message;
    userMessageElement.dataset.messageText = message;
    addMessageOptions(userMessageElement);
    chatlog.appendChild(userMessageElement);
    scrollToLatestMessage();
}

/**
 * Displays a bot message in the chat log.
 * @param {string} message - The bot message to display.
 */
function displayBotMessage(message) {
    hideTypingIndicator();
    const formattedMessage = message
        .replace(/ {2}/g, match => ' '.repeat(match.length))
        .replace(/(?:\r\n|\r|\n)/g, '<br>');

    const botMessageElement = document.createElement('div');
    botMessageElement.classList.add('bot-message');
    botMessageElement.innerHTML = formattedMessage;
    botMessageElement.dataset.messageText = message;

    addMessageOptions(botMessageElement);
    chatlog.appendChild(botMessageElement);
    scrollToLatestMessage();
}

/**
 * Adds options (Delete, Copy) to each message element.
 * @param {HTMLElement} messageElement - The message element to add options to.
 */
function addMessageOptions(messageElement) {
    const optionsButton = document.createElement('div');
    optionsButton.classList.add('message-options');
    optionsButton.innerHTML = '⋮';

    const dropdown = document.createElement('div');
    dropdown.classList.add('dropdown-content');

    const deleteButton = document.createElement('button');
    deleteButton.innerText = 'Delete';
    deleteButton.addEventListener('click', () => {
        messageElement.remove();
    });

    const copyButton = document.createElement('button');
    copyButton.innerText = 'Copy';
    copyButton.addEventListener('click', () => {
        const messageText = messageElement.dataset.messageText; // Get the message text from data attribute
        const tempDiv = document.createElement('div');
        tempDiv.innerHTML = messageText;
        const plainText = tempDiv.textContent || tempDiv.innerText || ''; // Extract plain text
        navigator.clipboard.writeText(plainText).then(() => {
            closeAllDropdowns(); // Close all dropdowns after copying
        }).catch(err => {
            console.error('Error copying text: ', err);
        });
    });

    dropdown.appendChild(deleteButton);
    dropdown.appendChild(copyButton);
    optionsButton.appendChild(dropdown);
    messageElement.appendChild(optionsButton);

    optionsButton.addEventListener('click', (event) => {
        event.stopPropagation(); // Prevent event from bubbling up to window click listener
        closeAllDropdowns(); // Close all other dropdowns
        dropdown.classList.toggle('show');
    });
}

/**
 * Closes all dropdowns
 */
function closeAllDropdowns() {
    const messageDropdowns = document.querySelectorAll('.dropdown-content');
    messageDropdowns.forEach(dropdown => {
        dropdown.classList.remove('show');
    });
}

// Close the dropdown if the user clicks outside of it
window.addEventListener('click', function(event) {
    if (!event.target.closest('.message-options')) {
        closeAllDropdowns();
    }
});

/**
 * Displays the typing indicator.
 */
function displayTypingIndicator() {
    typingIndicator.style.display = 'flex';
    scrollToLatestMessage();
}

/**
 * Hides the typing indicator.
 */
function hideTypingIndicator() {
    typingIndicator.style.display = 'none';
}

/**
 * Scrolls to the latest message in the chat log.
 */
function scrollToLatestMessage() {
    const chatlogContainer = document.getElementById('chatlog-container');
    chatlogContainer.scroll({
        top: chatlogContainer.scrollHeight,
        behavior: 'smooth'
    });
}

// Display the initial bot message
const welcomeBotMessage = "Hi there, I'm Chatbot 1. Nice to meet you!";
const initialMessage = "How can I help you today?";
displayBotMessage(welcomeBotMessage);
displayBotMessage(initialMessage);
Based on my experience, the hardest part is getting the position right using CSS. Mastery of CSS manipulation is much harder than mastering HTML and JavaScript combined. However, frontend development is still fun because I can have immediate feedback on my development, unlike AI/ML development where results take time to produce and the output is also stochastic and harder to predict.
