
Practical Guide to UI/UX in Full-Stack Chatbot Development
Published:
This articles provides insights into developing a full-stack chatbot application with a strong focus on UI/UX.
Chatbots are mainly used for customer service, personal assistance, and information retrieval in the industry. They consist of a chat interface that enables end users to interact with a non-human entity for automated assistance. The invention of the chatbot is revolutionary as it greatly reduces manpower and business operational costs, and it can operate 24/7 with consistent performance provided there is adequate engineering maintenance.
In this series of code examples, I will primarily use HTML, CSS, JavaScript, and Python. You might be using frameworks like React, Bootstrap, or other modern technologies for the frontend. Go ahead! I preferred to code with vanilla frontend languages without frameworks as my interfaces were simplistic and I wanted to have complete control over the design, but you can still adapt the coding examples I provided to your product.
I have learned everything about frontend, UI/UX, backend, and chatbot development from scratch through trial and error and online resources without formal education in software engineering. Although this is about full-stack chatbot development, all of the insights I’ll discuss in this series will mainly focus on frontend with minimal backend aspects and mostly based on my experiences and intuitions.
To be clear, this is not a step-by-step tutorial on constructing a chatbot. Rather, this article aims to guide you and provide insights on how to approach the process.
Step 1: Define the Chatbot’s Objectives
The first question you should ask yourself is: What is the purpose of your chatbot? Is the chatbot for customer service to answer customers’ queries? Should it perform information retrieval tasks like retrieving essential information from PDFs? Or should it be used merely for entertaining users? Each purpose requires a very different approach to constructing the backend logic. Based on your objectives, do you need an AI to operate the conversation, or will a rule-based system using Python NLTK suffice? The former is much more complicated as it requires significant computational power especially a GPU for scalability, while the latter is easier to implement but tedious in defining all the rules needed for the conversation flow.
Here’s a detailed comparison between AI and non-AI chatbots to help you decide which approach suits your needs the best:
| AI | Non-AI | |
|---|---|---|
| Task Complexity | Very high. You need a good understanding of NLP for development | Low. You just require basic programming logic for rule construction |
| Response Generation | Generally slow depending on the length of responses, and extremely slow without GPU | Fast but varies depending on the rule-based system. The time complexity is O(n*m), where n is the length of the input text and m is the number of rules |
| Development Cost and Time | Expensive with a longer development period for scaling to more users. You might need to purchase GPUs or proprietary LLM APIs | Cheap with a shorter development period |
| Stochasticity | Very high, might produce unexpected responses if the LLM is not well-tuned or if your prompt engineering is not robust | Low, every response generated is expected within your rule definition |
| User Experience | Good, conversation is more natural | Worse, users might not input expected keywords, leading to poor responses |
| Tedium | High, especially if building a Retrieval Augmented Generation (RAG). Using frameworks like LangChain or LlamaIndex involves prompting using natural language instructions for prompt engineering. Small changes in prompts can drastically impact the output | Very high as you need to handle all conversation cases and consider every context. Similar to constructing a sound mathematical proof where all edge cases must be covered |
| Scalability Complexity | Very high. As users increase, you need to consider having enough tokens for all users, which requires very efficient resource management | Lower. The main concern is managing and updating the chatbot conversation rules |
| Uses Cases | Customer service, complex query handling, personalized interactions, information retrieval | Simple FAQ service, basic query handling |
Regardless of the objectives of your project and proposed tools and technologies, the UI/UX aspects of a chatbot are universal and can be implemented in most scenarios.
Step 2: Decide on Chatbot’s Features
What do you want your chatbot software to do besides chatting? Do you need a reset history functionality? What about a light and dark mode feature that allows users to select their own aesthetic interface for the software? Should users send messages through a clickable button or just press Enter on the keyboard to achieve the same result, or both? Do you want users to save or share their conversation history? What if users want to delete a message or copy it, do you want to include a feature for this? Do you need clickable prompts so that users have an idea to get started with the conversation? Do you need a simple FAQ so that users can learn more about your software? Should users be using voice commands for inputting text? Most of the features you add will directly impact the UX of the product, either enhancing or degrading it, so it is crucial to consider them decisively. Don’t overwhelm your users with too many features. The key to good UI/UX is to enable your users to use your chatbot without having to think much.
Don’t worry too much about the nitty-gritty details of the features. I didn’t have all the ideas in mind when I constructed the chatbots. Based on my experience, frontend development is an iterative process. You can’t plan everything right from the beginning. As time passes and you have an MVP for your chatbot, you will naturally get ideas as you observe users interacting with your product. Observe their reactions when they navigate the product and take note of their pain points, then reimplement improvements. UI/UX can never be perfect on the first try. In product development, your main focus should be the core functionality of the product, which is the conversationalist chatbot. Focus on your chatbot logic with a basic interface first, then refine the UI/UX over time.
Naming Your Chatbot
Don’t forget to name your chatbot. Try to name your chatbot with a non-human name like MathBot, ChatArt, or something that is not a name like John Doe, Muthu, Siti, or Wang Dai Lou.
Here is the thought process for your reference:
- Choose a Concept
- What is the main purpose of your chatbot?
- Brainstorm Names
- List potential names that are non-human.
- Check Uniqueness
- Ensure the name is unique and not used by others.
- Finalise
- Select the best name that fits the purpose and uniqueness criteria.
Step 3: Project Setup and Planning
File Directory Setup
To get started, you should create a new virtual environment in your preferred IDE. VS Code is always recommended. At a basic level, you need 5 different files, each for its own purpose, and they can be named anything. Let’s name them index.html, styles.css, script.js, chatbot.py, and app.py for the standard practices. The python chatbot.py is to include the chatbot conversation, while app.py is to integrate the frontend and backend using Flask.
The project structure setup could be:
project/
│
├── static/
│   ├── styles.css
│   └── script.js
│
├── templates/
│   └── index.html
├── chatbot.py
├── app.py
└── requirements.txt
The project structure varies according to your languages and frameworks, as well as the scale of your chatbot. Feel free to adjust it to your needs.
Before proceeding, I want to share an important tip:
Tip: It is important to know how to regularly save your code using Git on an online platform like GitHub from the IDE you’re using whenever you make progress.
This practice helps in tracking changes to your code and ensures thorough documentation throughout the development process. Avoid manually modifying the code directly on GitHub after that, as this can cause Git conflicts and slow down the engineering progress.
Step 4: Develop Chatbot Logic for Backend Functionality
Although this is listed as Step 4, you could also make it Step 5. You can construct the backend before the frontend, or vice versa. There’s no hard rule for this. The backend and frontend can also be developed simultaneously, especially if you’re working in a team with dedicated roles for frontend, backend, database, etc. But I prefer to construct the chatbot logic before building the frontend because understanding how the chatbot functions helps in designing a UI that complements the overall UX.
Designing Chatbot Conversations
When designing the chatbot conversation output, it is best not to make it too “human”. From my observation, if it is too human-like, users might expect too much from the chatbot and treat it as a super AI when it’s not, so it might disappoint users more when its performance doesn’t match their expectations. Try to avoid generating output that includes emotions, slang, or filler words. The tone of language should be professional and formal unless you’re trying to build a chatbot for entertainment, then that’s a different context.
| Do | Don’t | |
|---|---|---|
| Tone | Use professional language | Use slang or informal words |
| Content | Keep responses clear and direct | Add unnecessary filler words |
| Emotions | Maintain a neutral tone | Display emotions |
Designing Chatbot Pipeline
For a non-AI chatbot, a rule-based system forms the backbone of its functionality without relying on complex language models. It operates by establishing predefined rules and patterns that dictate how the chatbot interprets user inputs and generates responses. That’s why you need to consider all possible interactions users may have with your chatbot. It’s best to include clickable common query prompts or a clear initial instruction message from the bot to help users effectively navigate the conversation. Clickable prompts offer users predefined options or actions, each linked to specific rules within the chatbot’s decision-making framework and allows it to quickly retrieve and deliver responses to common queries.
For an AI chatbot, you need to find an LLM suitable for your context. There are two types of LLMs: proprietary and open source. Proprietary models are powerful but require payment per API call, while open-source models are free but less powerful. Typically for a production business chatbot in customer service, education, research, or internal company use, you would need to build a Retrieval Augmented Generation (RAG) pipeline with relevant datasets (it could be in JSON, PDF, CSV, or whatever format for storing information) and integrate the LLM into it. The LLM utilises embeddings (vector representations of text) to understand and generate human-like responses. So prompt engineering becomes a crucial process to “fine-tune” the model’s performance, often involving techniques such as few-shot learning and context management to optimise for specific tasks.
Assuming you have built the chatbot logic using Python and included it in chatbot.py. It is recommended to test your chatbot conversation logic before integrating it with the frontend. Especially if you’re using an LLM, you need to set up various configurations like embedding models, tokenizers, and more settings. A single aspect not working correctly can crash your entire chatbot system. That’s why it is essential to have error logging in place and carefully observe every output your code produces before integrating with the frontend.
Step 5: Create a Simple Chatbot Interface
As mentioned in Step 2, for frontend development, it is best to build a very basic interface first and add features one by one. Trying to add everything at once will cause significant bugs in your code and slow down the development process.
Essential Elements of a Chatbot Interface
A simple chatbot interface should have:
| Element | Description |
|---|---|
| Chat Window | • Scroll back to previous chats • Responsive design for various devices |
| Text Input Box | • Expandable or scrollable text input field • Placeholder text to guide user input |
| Send Button | • Interface button for sending messages |
| Quick Reply Shortcut Button | • Keyboard shortcut button (typically “Enter”) |
| Displays for Bot and User Messages | • Automatic scrolling to the most recent message • Clear visual distinction between bot and user messages |
| Typing Indicator for Bot | • Indication of when the bot is typing |
| Message Management for Users | • Options to copy or delete messages |
Effective UI Design Prototyping
The standard first step to building a UI is using prototyping tools like Figma or Adobe XD. But for simpler projects or when you don’t need to prototype for stakeholders, these tools may not be necessary. Since both of my chatbot interfaces were not complicated, I just visualised the design in my mind and coded it out.
Comparison between prototyping tools and direct coding:
| Prototyping Tools | Direct Coding | |
|---|---|---|
| Ease of Visualisation | Excellent for visualising layout and flow of UI | Requires mental visualisation or basic sketches |
| Development Process | Design each element in the tool, simulate interactions | Directly code the design, provides a clear view of technical feasibility |
| Feedback and Iteration | Quick through interactive prototypes | Feedback comes from running the code directly |
| Identifying Issues | Helps identify issues early through detailed wireframes | Issues identified through coding and running the design |
| Technical Feasibility | May overlook some technical challenges until coding begins | Provides immediate insight into technical feasibility |
| Example Use Case | Complex chatbot interfaces with multiple features | Simple chatbot interfaces with basic features |
If visual prototyping is required, start by sketching out your ideas on paper or a whiteboard to visualise the layout and flow of your interface. Then, move to prototyping tools to create detailed wireframes and interactive prototypes. These tools allow you to design each element of your interface, from buttons to text fields, and link them to simulate user interactions. This process helps you identify potential issues and gather feedback before writing any code, and also saves time and effort in the long run. Finally, refine the design based on the stakeholders’ input after testing your prototype with them to ensure a more user-friendly final product.
Clear and Simple Design with Colour Theory
The design must be clear, clean, and simplistic, with visual cues that inform users on how to use the product. The colour scheme should adhere to colour theory to ensure adequate contrast between background and foreground elements (text, buttons, icons) for easier readability. Colour psychology is useful when deciding the application’s colours. For example, red typically stands for urgency and immediate attention so it is suitable for features related to deletion or destruction. Green represents new beginnings, like young green grass growing from soil, making it ideal for the send button to signify sending new messages.
Use icons to represent buttons instead of words. This can be done using Font Awesome, a popular icon toolkit that provides a wide range of icons for various purposes. Icons enhance visual appeal and usability by providing intuitive symbols for actions, effectively reducing cognitive load.
Consistent use of colour throughout the application is essential. Regarding the number of colours used, it should not be excessive. Lao Tzu once said, “The five colours make a man blind” and I interpret it as too many colours can overwhelm users. Also, the colours should blend professionally, though it’s difficult to define, poor colour combinations are easily noticeable. For coding colours, you can search for hex and RGB codes to explore available options.
For a better user experience, features should provide instant feedback when users interact with them, such as a hover effect when touching a button or a simple animation when clicking it. Otherwise users might think their action on features is delayed or not working. Implementing CSS transitions and animations can greatly enhance perceived responsiveness.
Try to consider people with poor eyesight or colour blindness. Text size and foreground elements should be distinctive enough to be seen from 1 meter away. Designing with diverse backgrounds in mind ensures the design and colours cater to most groups.
Reduce the number of words in your product. Too many words can confuse users or make the product take too long to figure out how to use it. Simplicity is key. The interface should be understandable and intuitive at first glance. This aligns well with UX principles like the Hick-Hyman Law to streamline user decision-making.
Example of a Weak Chatbot UI Design
Chatbot design varies in types. One common type is optimised for small screens, such as mobile phones, where messages from the bot and the user appear from the left and right corners respectively. This layout is effective for mobile devices because it uses the limited screen space efficiently and keeps the conversation flow intuitive and easy to follow.
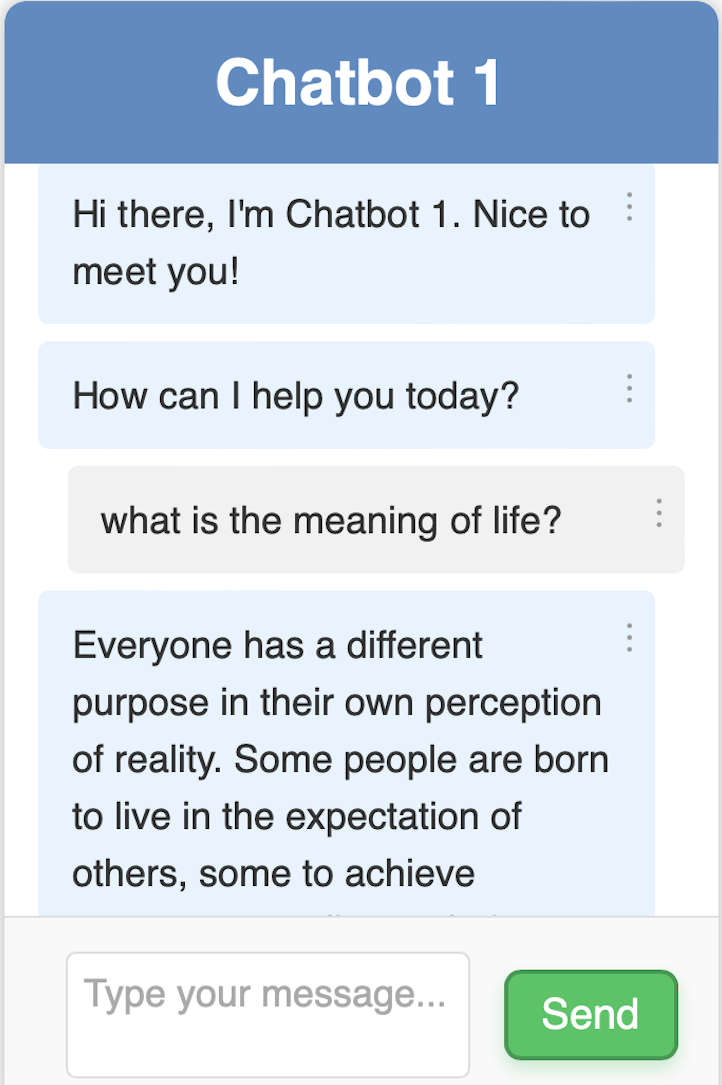
Although this is not an accurate representation of a mobile device size, you can see that when the screen is small, the user and bot messages still look great overall. This design is also suitable for small pop-out messaging applications, like Facebook’s interface for user messaging, which is compact.
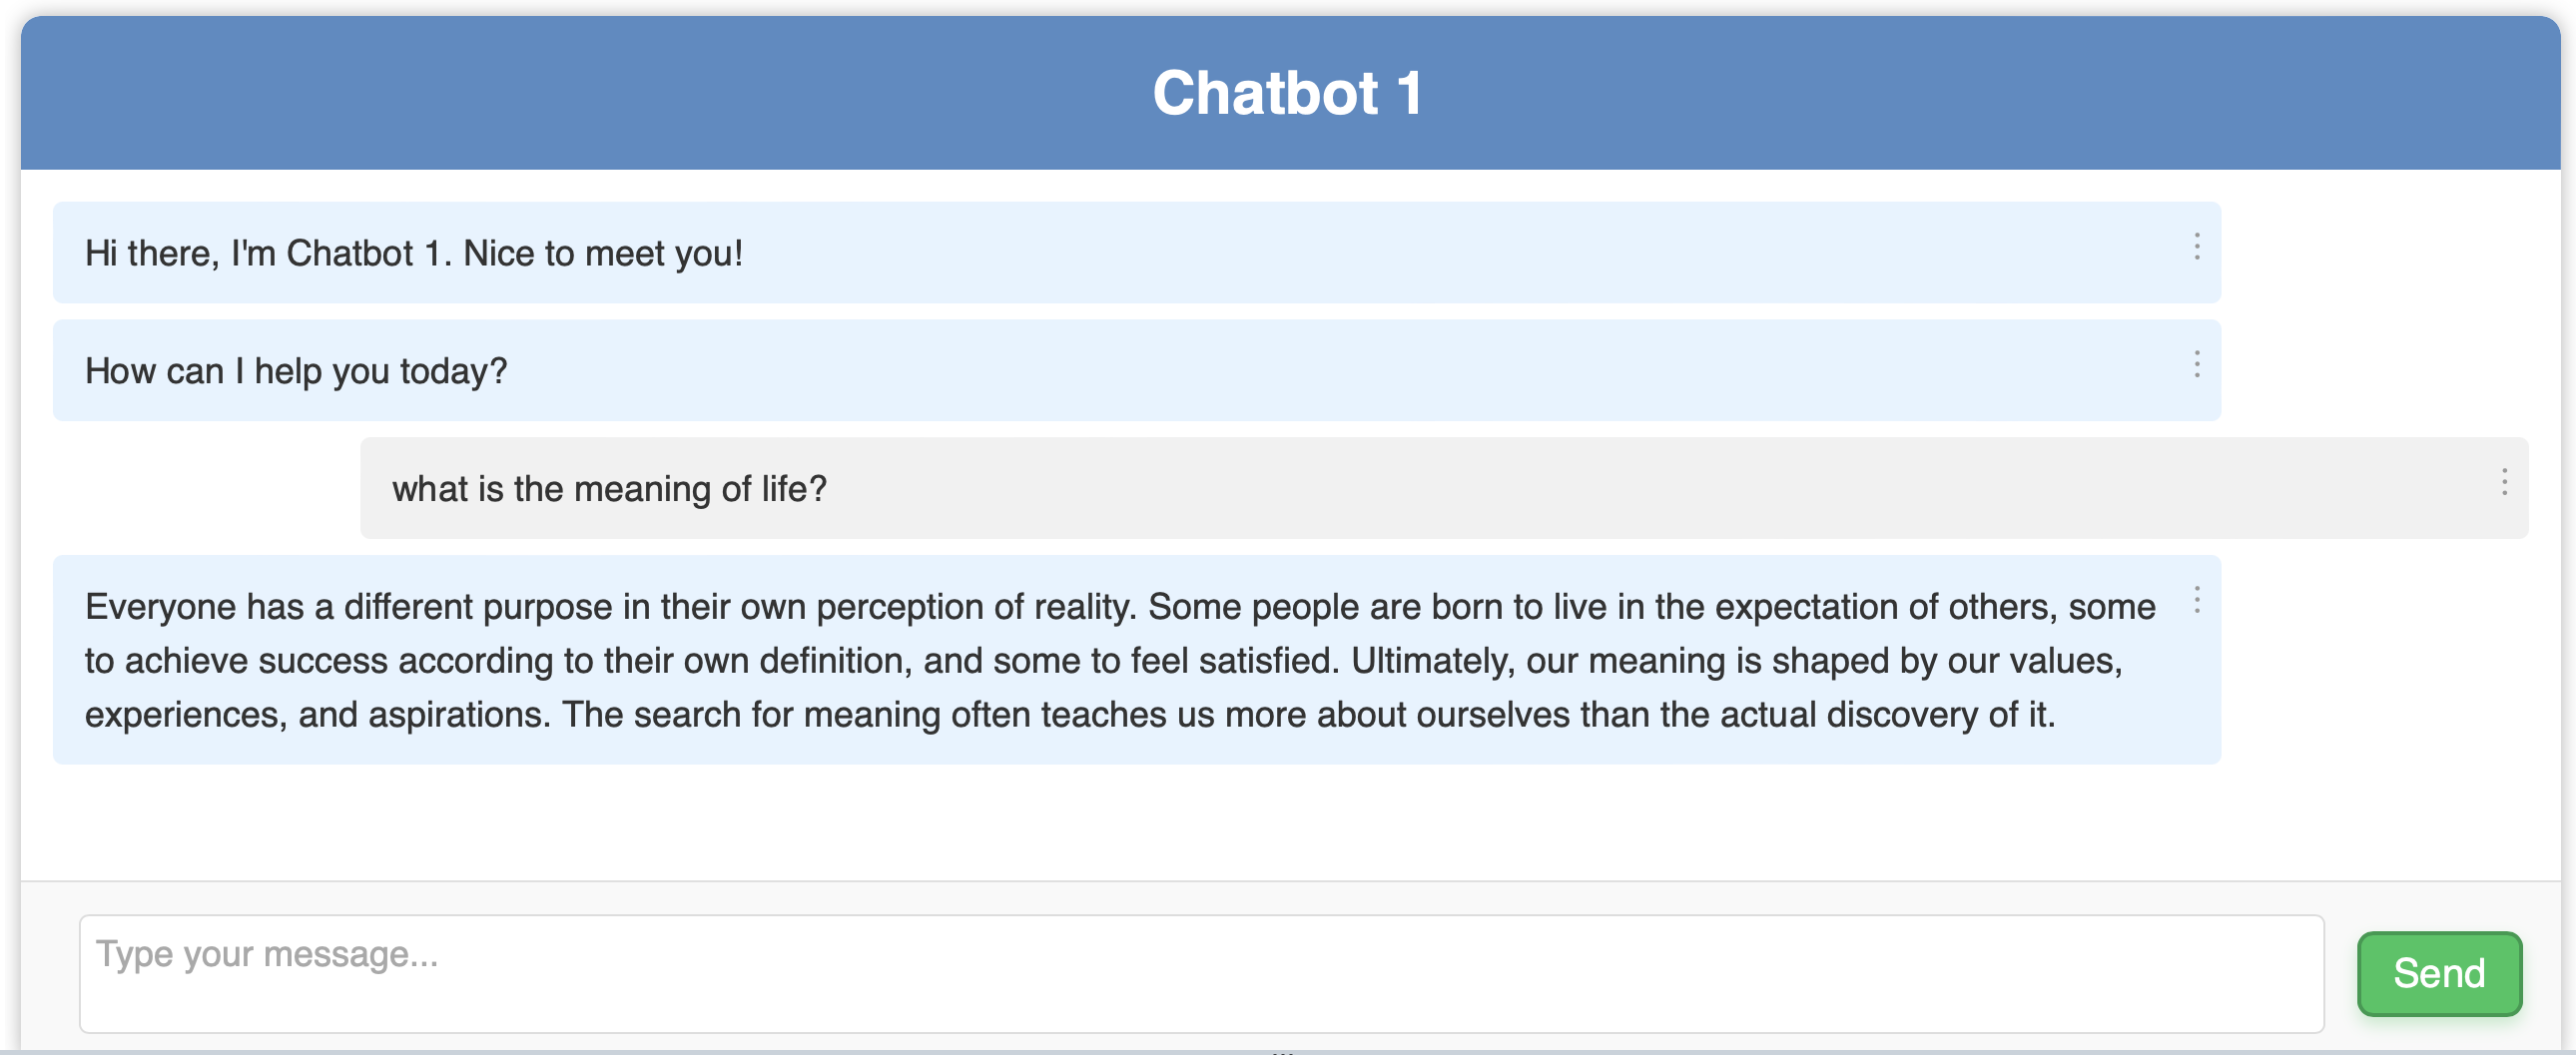
However, when displaying Chatbot 1 on large screens, the design looks unattractive. As most users are not expected to input as many words compared to the chatbot, all text would concentrate to the left, making the right side of the desktop screen look empty. This design is not user-friendly for large screens, as it requires users to move their eyes from left to right to read the messages. For larger screens, a more suitable design involves making the chat container smaller, ideally limiting it to at most 60% of the web page width, creating a more centralised and compact chat area that is easier to read without excessive eye movement. Placing the chat container in the center of the screen with ample margins on either side, can improve readability and focus.
This design for Chatbot 1 also has several drawbacks. The send button uses words instead of icons, which makes the overall design look inconsistent. While the send button size is suitable for the web, it appears too large on mobile devices, highlighting the importance of responsive design across all device sizes. Additionally, the chatbot header is too big. For an LLM-powered application, where responses are often lengthy, the large header becomes disruptive by displaying less text at once. It is advisable to either remove the header or reduce its size. The grey user input container that encapsulates the text area is also a waste of space and should be resized or removed to maximise usable space.
Optimising Chatbot UI Design for Different Screen Sizes
Here’s one possible design for the revised chatbot UI, designed by myself. It’s simple, so some whitespace isn’t used effectively. Note that I’m not a professional designer, so please lower your expectations a little XD.
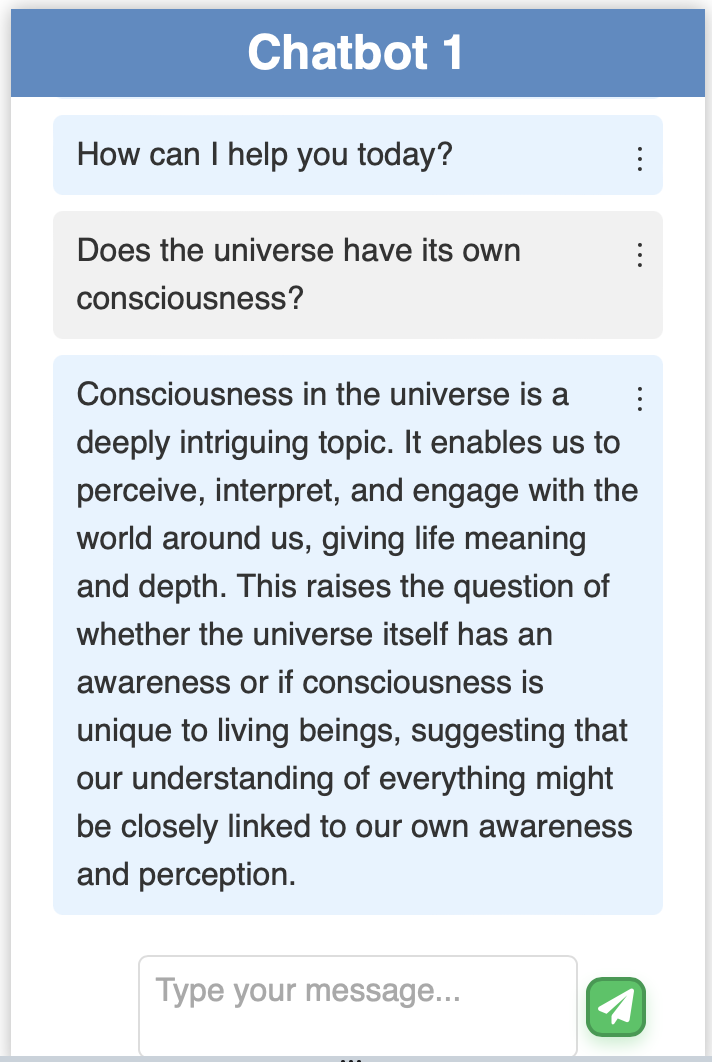
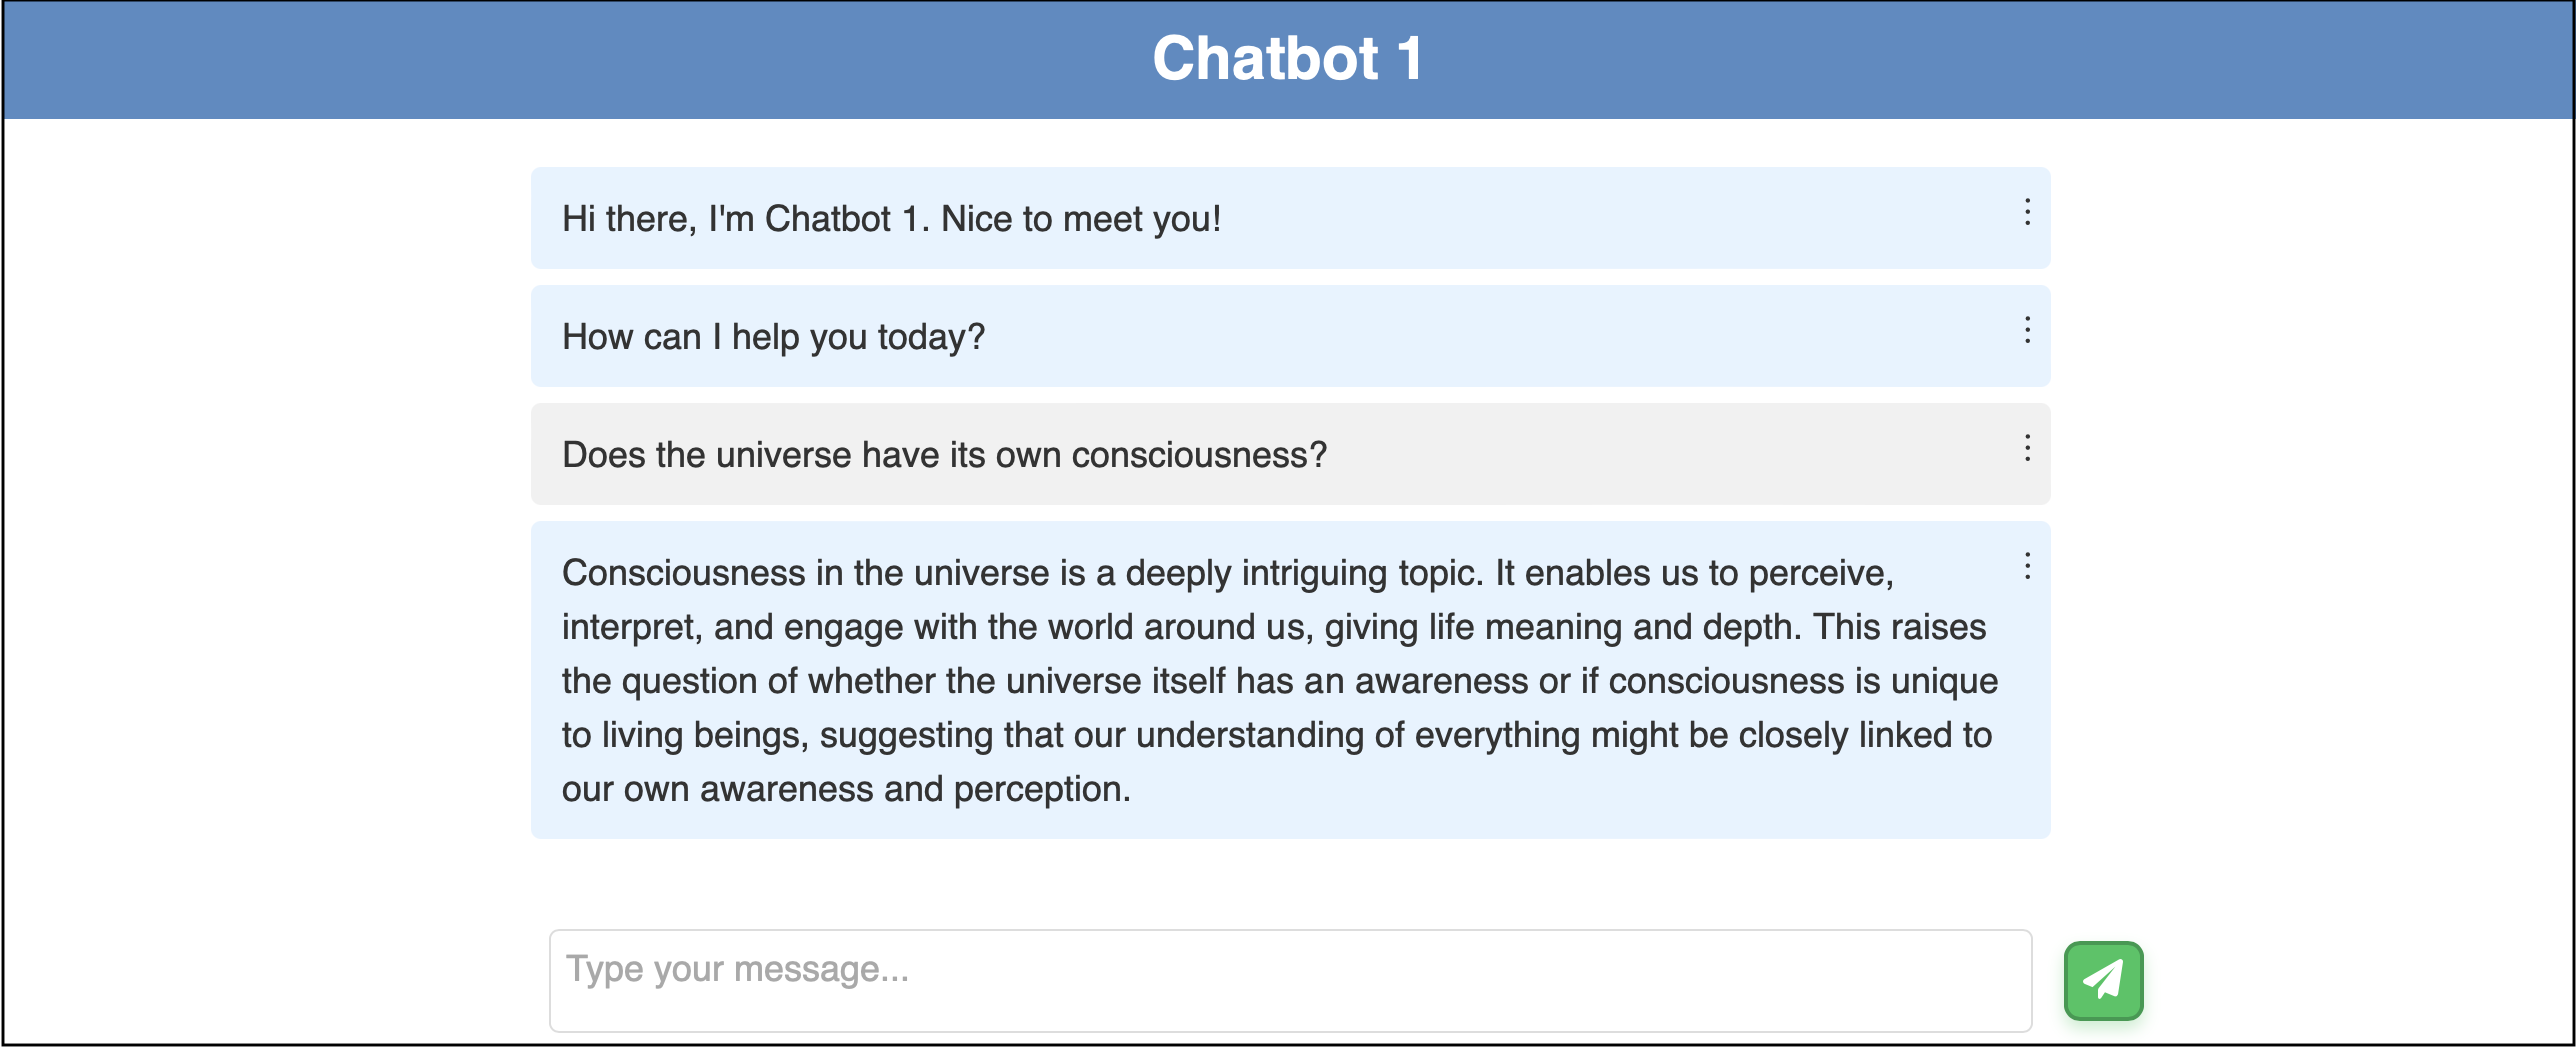
Feel free to adjust the color or positioning of the bot and user messages if you prefer not to display them vertically and parallel. Another suggestion is to make either the user or bot message transparent, avoiding boxed enclosures. This method effectively distinguishes between user and bot messages, especially useful for LLM-powered applications where bot messages are often longer.
Chatbot UI Frontend Code
I will provide a frontend code for the above chatbot UI. The code should be self-explanatory and intuitive if you’re well-versed in frontend development.
HTML for Structuring
The HTML code defines the structure of the chatbot interface to ensure that each element is semantically and structurally appropriate for web rendering. This includes the main container for the chatbox, a top bar for the chatbot’s name, a dynamic area for chat logs, and user input fields. The chatbot interface is designed to be modern and compatible across various browsers and devices. The structure is intentionally kept minimalistic to maintain simplicity and ease of use while adhering to standard web practices for optimal accessibility.
The use of meta tags ensures proper viewport settings for responsive design, and the modular approach of linking external CSS and JavaScript files aids in maintaining separation of concerns, which is a fundamental principle in web development for better scalability and maintainability. This code integrates Font Awesome for access to a wide range of icons for buttons, enhancing visual appeal of the interface.
<!DOCTYPE html>
<html lang="en">
<head>
    <meta charset="UTF-8">
    <meta name="viewport" content="width=device-width, initial-scale=1.0">
    <title>Chatbot 1</title>
    <link rel="stylesheet" href="https://cdnjs.cloudflare.com/ajax/libs/font-awesome/6.0.0-beta3/css/all.min.css">
    <link rel="stylesheet" href="/static/styles.css">
</head>
<body>
    <div class="container" id="chatbotContainer">
        <div class="chatbox">
            <div class="top-bar">
                <div class="chatbot-name">Chatbot 1</div>
            </div>
            <div class="chatlog-container" id="chatlog-container">
                <div id="chatlog"></div>
                <div id="typingIndicator" class="bot-message typing-indicator" style="display: none;">
                    <span class="typing-text">Generating</span>
                    <span class="dot"></span>
                    <span class="dot"></span>
                    <span class="dot"></span>
                </div>
            </div>
            <div class="user-input-container">
                <textarea id="userInput" placeholder="Type your message..."></textarea>
                <button type="submit" id="sendButton"><i class="fas fa-paper-plane"></i></button>
            </div>
        </div>
    </div>
    <script src="/static/script.js" type="module"></script>
</body>
</html>
CSS for Styling
In developing the CSS for the chatbot, attention to common styles across the interface is essential for a unified user experience. The chatbox is designed to be flexible and adaptable to various screen sizes and orientations. By adhering to a consistent colour scheme and font choice, the design maintains clean and professional visual coherence. Key elements such as the chat log container, user input container, and message displays are styled to ensure clarity. The send button is enhanced with interactive hover and active states to provide immediate visual feedback for better user engagement.
The use of transitions and animations for elements like buttons and the typing indicator adds a level of responsiveness and better user interaction. Flexbox layout techniques ensure robustness and adaptability across different devices. Media queries are employed to adjust the layout for mobile devices, ensuring the interface remains functional and visually appealing across different platforms.
/* Common styles */
html, body {
  height: 100%;
  margin: 0;
  padding: 0;
  transition: background-color 0.3s ease, color 0.3s ease;
}

/* Chatbox */
.chatbox {
  display: flex;
  flex-direction: column;
  height: 100vh;
  width: 100vw;
  background-color: rgba(255, 255, 255, 0.9);
  box-shadow: 0 0 10px rgba(0, 0, 0, 0.3);
  overflow: hidden;
  font-family: 'Roboto', sans-serif;
  line-height: 1.5;
}

.top-bar {
  display: flex;
  justify-content: space-between;
  align-items: center;
  padding: 0.5rem;
  background-color: #558bc4;
  color: #fff;
}

.top-left, .top-right {
    display: flex;
    align-items: center;
}

.chatbot-name {
  font-weight: bold;
  font-size: 30px;
  margin: 0 auto;
}

.chatlog-container {
  flex-grow: 1;
  overflow-y: auto;
  padding: 1rem;
}

/* User input container */
.user-input-container {
  display: flex;
  align-items: center;
  justify-content: center;
  margin-top: auto;
  padding: 0.25rem;
  background-color: rgba(255, 255, 255, 0.9);
  position: relative;
}

.user-input-container textarea {
  padding: 0.5rem;
  border: 1px solid #ddd;
  border-radius: 5px;
  background-color: #fff;
  color: #333;
  font-family: 'Roboto', sans-serif;
  font-size: 18px;
  margin: 0.25rem auto;
  width: 58%;
  height: 3.5rem;
  max-height: 7rem;
  overflow-y: scroll;
  resize: none;
  box-sizing: border-box;
}

/* Send button */
.user-input-container button {
    width: 40px;
    height: 40px;
    border: none;
    border-radius: 8px;
    font-family: 'Roboto', sans-serif;
    font-size: 20px;
    transition: background-color 0.3s ease, transform 0.3s ease, box-shadow 0.3s ease;
    cursor: pointer;
    display: flex;
    align-items: center;
    justify-content: center;
    box-shadow: 0 4px 6px rgba(0, 0, 0, 0.2);
    position: relative;
    overflow: hidden;
}

.user-input-container #sendButton {
  position: absolute;
  right: calc(50% - 30% - 40px);
  background-color: #22c55e;
  color: #fff;
  border: 2px solid #1b9a4b;
  box-shadow: 0 4px 8px rgba(34, 197, 94, 0.3);
}

#sendButton:hover {
    background-color: #377035;
    transform: scale(1.05);
    outline: 2px solid #1b9a4b;
    outline-offset: 2px;
}

#sendButton:active {
    transform: scale(0.95);
    box-shadow: 0 2px 4px rgba(0, 0, 0, 0.2);
}

.user-input-container button:focus {
    outline-offset: 2px;
}

.user-input-container button::before {
    content: '';
    position: absolute;
    top: 50%;
    left: 50%;
    width: 0;
    height: 0;
    background: rgba(255, 255, 255, 0.5);
    border-radius: 50%;
    transform: translate(-50%, -50%);
    opacity: 0;
    transition: width 0.4s ease, height 0.4s ease, opacity 0.8s ease;
}

.user-input-container button:active::before {
    width: 200%;
    height: 200%;
    opacity: 0;
}

.message-text {
  cursor: pointer;
  text-align: center;
  display: inline-block;
  padding: 5px 10px;
  background-color: #f1f1f1;
  border: 4px solid #f1f1f1;
  border-radius: 10px;
  margin-bottom: 10px;
  color: #333;
  font-size: 18px;
  font-weight: bold;
  transition: background-color 0.3s ease;
}

.message-text {
  cursor: pointer;
  text-align: center;
  display: inline-block;
  background-color: #f1f1f1;
  border: 4px solid #f1f1f1;
  color: #333;
  font-size: 18px;
  font-weight: bold;
  transition: background-color 0.3s ease;
}

.message-text:hover {
  background-color: #bebebe;
}

/* User and bot message */
.user-message, .bot-message {
  position: relative;
  margin: 0.5rem auto;
  padding: 0.75rem 1rem;
  border-radius: 5px;
  font-size: 18px;
  line-height: 1.5;
  max-width: 58%;
  word-wrap: break-word;
}

.user-message {
  background-color: #f1f1f1;
  color: #333;
  text-align: left;
}

.bot-message {
  background-color: #e6f3ff;
  color: #333;
  text-align: left;
}

.message-options {
  position: absolute;
  top: 0.5rem;
  right: 0.5rem;
  cursor: pointer;
  font-size: 20px;
  color: #333;
}

/* Typing indicator */
.typing-indicator {
  display: flex;
  align-items: center;
  margin-bottom: 0.5rem;
  font-size: 18px;
}

.typing-indicator .typing-text {
  margin-right: 10px;
  color: #333;
}

.typing-indicator .dot {
  width: 10px;
  height: 10px;
  margin: 0 2px;
  background-color: #333;
  border-radius: 50%;
  display: inline-block;
  animation: bounce 1.4s infinite ease-in-out both;
}

.typing-indicator .dot:nth-child(2) {
  animation-delay: -0.32s;
}

.typing-indicator .dot:nth-child(3) {
  animation-delay: -0.16s;
}

@keyframes bounce {
  0%, 80%, 100% {
    transform: scale(0);
  }
  40% {
    transform: scale(1);
  }
}

/* Dropdown for messages */
.dropdown-content {
  display: none;
  position: absolute;
  right: 0;
  background-color: #ffffff;
  min-width: 90px;
  box-shadow: 0 4px 8px rgba(0, 0, 0, 0.1);
  border-radius: 4px;
  z-index: 1;
}

.dropdown-content button {
  width: 100%;
  padding: 12px 16px;
  text-align: left;
  border: none;
  background: none;
  cursor: pointer;
  font-size: 16px;
  transition: background-color 0.3s ease;
}

.dropdown-content button:hover {
  background-color: #f3f3f3;
}

.show {
  display: block;
}

/* Responsive design for mobile */
@media (max-width: 768px) {
  .chatbox {
    height: 100vh;
    width: 100%;
  }

  .top-bar {
    padding: 0.25rem;
    font-size: 18px;
  }

  .chatbot-name {
    font-size: 24px;
  }

  .chatlog-container {
    padding: 0.5rem;
  }

  .user-input-container {
    display: flex;
    align-items: center;
    padding: 0.25rem;
    position: relative;
  }

  .user-input-container textarea {
    font-size: 16px;
    width: 65%;
    height: 3rem;
    margin: 0;
  }

  .user-input-container button {
    width: 30px;
    height: 30px;
    font-size: 18px;
    flex-shrink: 0;
    position: absolute;
  }

  .user-message, .bot-message {
    padding: 0.5rem 0.75rem;
    font-size: 16px;
    max-width: 85%;
  }

  .message-options {
    font-size: 18px;
  }

  .typing-indicator {
    font-size: 16px;
  }

  .typing-indicator .dot {
    width: 8px;
    height: 8px;
  }

  .dropdown-content button {
    padding: 10px 14px;
    font-size: 14px;
  }
}
JavaScript for Interactivity
This code manages user interactions and message processing within the chatbot interface. This includes functions for sending messages, dynamically adjusting the textarea height, and efficiently handling user input events. Event listeners are implemented for the send button and textarea, ensuring smooth capture of user actions and key events. Additional functionalities like displaying typing indicators and managing message options like delete and copy, enhance interactivity. The script ensures scrolling of the chat log to the latest message for maintaining the continuity of conversation. The Fetch API is used to send user messages to the server and retrieve bot responses, using asynchronous communication between the frontend and backend.
// Get DOM elements
const chatlog = document.getElementById('chatlog');
const userInput = document.getElementById('userInput');
const textarea = document.querySelector('.user-input-container textarea');
const sendButton = document.getElementById('sendButton');
const chatbotContainer = document.getElementById('chatbotContainer');
const typingIndicator = document.getElementById('typingIndicator');

chatbotContainer.style.display = 'block';

/**
 * Sends a message to the chatbot.
 * @param {string} message - The message to send.
 */
function sendMessage(message) {
    displayUserMessage(message);
    sendUserMessageToServer(message);
    resetTextarea();
}

// Event listener for expanding text area
textarea.addEventListener('input', function() {
    adjustTextareaHeight(this);
});

/**
 * Adjusts the height of the textarea based on its content.
 * @param {HTMLElement} textarea - The textarea element.
 */
function adjustTextareaHeight(textarea) {
    textarea.style.height = 'auto';
    const maxHeight = parseInt(getComputedStyle(textarea).maxHeight);
    if (textarea.scrollHeight > maxHeight) {
        textarea.style.height = `${maxHeight}px`;
        textarea.style.overflowY = 'auto';
    } else {
        textarea.style.height = `${textarea.scrollHeight}px`;
        textarea.style.overflowY = 'hidden';
    }
}

/**
 * Resets textarea size after sending a message.
 */
function resetTextarea() {
    textarea.value = ''; // Clear the textarea content
    textarea.style.height = '3.5rem';
    textarea.style.overflowY = 'auto';
    adjustTextareaHeight(textarea); // Adjust height immediately after reset
}

// Event listener for send button click
sendButton.addEventListener('click', handleUserInput);

// Event listener for user input enter key press and add new line
userInput.addEventListener('keyup', function (event) {
    if (event.keyCode === 13 && !event.shiftKey) {
        handleUserInput();
        event.preventDefault();
    }
});

/**
 * Handles user input and sends the message if not empty.
 */
function handleUserInput() {
    const message = userInput.value.trim();

    if (message !== '') {
        displayUserMessage(message);
        sendUserMessageToServer(message);
        // Clear the user input
        userInput.value = '';
        resetTextarea()
    }
}

/**
 * Sends the user's message to the server.
 * @param {string} message - The message to send.
 */
function sendUserMessageToServer(message) {
    displayTypingIndicator();
    fetch('/query', {
        method: 'POST',
        headers: {
            'Content-Type': 'application/json',
        },
        body: JSON.stringify({ user_query: message })
    })
    .then(response => response.json())
    .then(data => {
        hideTypingIndicator();
        if (data.status === 'success') {
            displayBotMessage(data.response);
        } else {
            console.error('Error querying:', data.message);
        }
    })
    .catch(error => {
        console.error('Error querying:', error);
        hideTypingIndicator();
    });
}

/**
 * Displays a user message in the chat log.
 * @param {string} message - The user message to display.
 */
function displayUserMessage(message) {
    const userMessageElement = document.createElement('div');
    userMessageElement.classList.add('user-message');
    userMessageElement.innerText = message;
    userMessageElement.dataset.messageText = message;
    addMessageOptions(userMessageElement);
    chatlog.appendChild(userMessageElement);
    scrollToLatestMessage();
}

/**
 * Displays a bot message in the chat log.
 * @param {string} message - The bot message to display.
 */
function displayBotMessage(message) {
    hideTypingIndicator();
    const formattedMessage = message
        .replace(/ {2}/g, match => ' '.repeat(match.length))
        .replace(/(?:\r\n|\r|\n)/g, '<br>');

    const botMessageElement = document.createElement('div');
    botMessageElement.classList.add('bot-message');
    botMessageElement.innerHTML = formattedMessage;
    botMessageElement.dataset.messageText = message;

    addMessageOptions(botMessageElement);
    chatlog.appendChild(botMessageElement);
    scrollToLatestMessage();
}

/**
 * Adds options (Delete, Copy) to each message element.
 * @param {HTMLElement} messageElement - The message element to add options to.
 */
function addMessageOptions(messageElement) {
    const optionsButton = document.createElement('div');
    optionsButton.classList.add('message-options');
    optionsButton.innerHTML = '⋮';

    const dropdown = document.createElement('div');
    dropdown.classList.add('dropdown-content');

    const deleteButton = document.createElement('button');
    deleteButton.innerText = 'Delete';
    deleteButton.addEventListener('click', () => {
        messageElement.remove();
    });

    const copyButton = document.createElement('button');
    copyButton.innerText = 'Copy';
    copyButton.addEventListener('click', () => {
        const messageText = messageElement.dataset.messageText; // Get the message text from data attribute
        const tempDiv = document.createElement('div');
        tempDiv.innerHTML = messageText;
        const plainText = tempDiv.textContent || tempDiv.innerText || ''; // Extract plain text
        navigator.clipboard.writeText(plainText).then(() => {
            closeAllDropdowns(); // Close all dropdowns after copying
        }).catch(err => {
            console.error('Error copying text: ', err);
        });
    });

    dropdown.appendChild(deleteButton);
    dropdown.appendChild(copyButton);
    optionsButton.appendChild(dropdown);
    messageElement.appendChild(optionsButton);

    optionsButton.addEventListener('click', (event) => {
        event.stopPropagation(); // Prevent event from bubbling up to window click listener
        closeAllDropdowns(); // Close all other dropdowns
        dropdown.classList.toggle('show');
    });
}

/**
 * Closes all dropdowns
 */
function closeAllDropdowns() {
    const messageDropdowns = document.querySelectorAll('.dropdown-content');
    messageDropdowns.forEach(dropdown => {
        dropdown.classList.remove('show');
    });
}

// Close the dropdown if the user clicks outside of it
window.addEventListener('click', function(event) {
    if (!event.target.closest('.message-options')) {
        closeAllDropdowns();
    }
});

/**
 * Displays the typing indicator.
 */
function displayTypingIndicator() {
    typingIndicator.style.display = 'flex';
    scrollToLatestMessage();
}

/**
 * Hides the typing indicator.
 */
function hideTypingIndicator() {
    typingIndicator.style.display = 'none';
}

/**
 * Scrolls to the latest message in the chat log.
 */
function scrollToLatestMessage() {
    const chatlogContainer = document.getElementById('chatlog-container');
    chatlogContainer.scroll({
        top: chatlogContainer.scrollHeight,
        behavior: 'smooth'
    });
}

// Display the initial bot message
const welcomeBotMessage = "Hi there, I'm Chatbot 1. Nice to meet you!";
const initialMessage = "How can I help you today?";
displayBotMessage(welcomeBotMessage);
displayBotMessage(initialMessage);
Based on my experience, the hardest part is getting the position right using CSS. Mastery of CSS manipulation is much harder than mastering HTML and JavaScript combined. However, frontend development is still fun because I can have immediate feedback on my development, unlike AI/ML development where results take time to produce and the output is also stochastic and harder to predict.
Step 6: Add More Features to the Chatbot
Navigating Feature Integration and UX Challenges
I’d like to share some of my personal experiences regarding feature integration and development. When adding a new feature or functionality, the UX can change significantly. Integrating new features can be challenging because it often requires changes to the existing workflow and can introduce complexities in user interactions.
Let’s consider a chatbot application integrated with a RAG system. This application enables users to upload multiple PDFs beforehand and select an LLM from various available options to chat with. Essentially, it’s a natural language generative AI that allows you to interact with your PDFs through chat.
When introducing a new feature for users to chat and get context from one specific PDF instead of retrieving vector indexes from all PDFs, it’s crucial to ensure that users select the LLM before selecting the PDF. This order of operations is essential because the LLM needs to be defined first to generate contextual embeddings for document indexing and accurately interpret and respond to the content of the selected PDF.
After selecting the LLM, the query mode initialises for configuration. Users should not be allowed to select another PDF or deselect the current one to return to default. Allowing such actions during processing could disrupt the system’s workflow, potentially leading to crashes or incorrect data handling. To prevent this, buttons for selecting another query mode should be disabled during processing.
If the application has more buttons, users might click on other buttons unexpectedly, complicating the interaction flow. For example, users might click to select another LLM to chat with even though the query mode is not fully set. Since setting the query mode requires a few seconds to load or retrieve vector indexes from the database, abruptly shifting to a new LLM could terminate the current query mode. This will cause errors or system crashes.
Consider other scenarios: What if users try to upload PDFs while the query mode is still being set? What if they delete a specific PDF, such as ‘animals.pdf’, immediately after selecting it for query mode configuration? What if they decide not to set the query mode to a specific PDF and revert to chatting with all PDFs? These scenarios highlight the need for robust error handling and careful workflow management to ensure a smooth and stable UX.
The effort and complexity of ensuring a good UX after adding a new feature are far more demanding than simply integrating the feature itself. Proper planning and error handling are crucial to maintaining a seamless user experience.
Thought Process on Handling Complex Workflows
As a math major, the thought process of managing complex workflows in AI and software development is very similar to constructing a rigorous mathematical proof. If you have taken an introductory discrete math course, you are likely familiar with proof by cases. I find that visualising how to handle different scenarios using the thought processes learned from proof by cases is particularly helpful. When developing a sound and valid proof, each step must logically follow from the previous one. Similarly, integrating complex workflows in development requires a systematic approach where each component is designed to logically follow from the previous one, ensuring that the overall system functions coherently.
Steps to Effectively Manage Complexities
Besides thinking from the proof by cases perspective, I also follow this structure in chronological order:
- Identify Related Code Segments
- When integrating a new feature, locate the code segments directly related to that feature. Consider the new feature as a node in the middle of a workflow. Identify the preceding and subsequent code segments that will interact with it. You can think this like a linked list.
- Minimise Modifications to Existing Code
- Try to minimise modifications to the existing codebase. Only make changes if you identify inefficiencies or if the current implementation is incompatible with the new feature. This approach helps maintain system stability and reduces the risk of introducing new bugs.
- Modularise the New Feature
- Develop the new feature as a separate, modular component whenever possible. This makes it easier to test and integrate without affecting the existing workflow.
- Implement Error Handling
- Incorporate comprehensive mechanisms to manage potential failures. This ensures that the system can handle unexpected scenarios and provide useful feedback.
- Ensure Smooth Transitions and State Management
- Maintain consistent state management throughout the workflow. Ensure that transitions between different states are smooth. This prevents disruptions in user interactions. Disable or enable controls appropriately to avoid conflicts during critical processes.
- Conduct Testing
- Test to verify the functionality of the new feature and its interaction with existing components. Simulate various user interactions to uncover potential issues and ensure a smooth UX.
Step 7: Integrate Frontend and Backend
Several widely-used tech stacks for integrating the frontend (client-side) and backend (server-side) are Django, Flask, Node.js, and Spring Boot.
Frontend-Backend Communication with RESTful API and Fetch API
Let’s consider Flask to create RESTful API endpoints and JavaScript with the Fetch API to handle communication between the frontend and backend. RESTful API endpoints follow the principles of REST architecture, much like CRUD operations. In Flask, this involves using HTTP methods such as POST for creating, GET for retrieving, PUT/PATCH for updating, and DELETE for removing resources. RESTful APIs facilitate communication, ideal for information transfer and dynamic operations in web apps. The Fetch API in JavaScript serves HTTP requests to these endpoints from the frontend, fetching resources asynchronously across the web and handling responses. This approach allows dynamic interaction between the UI and backend services. It supports tasks like data retrieval, submission, and updates without page reloads, which enhances the responsiveness of web apps.
You can think of it like a waiter serving food in a restaurant without making you leave your table. In this analogy, you (the client) are at the table (UI). The Fetch API is the waiter taking your order (HTTP requests) to the kitchen (server/backend with RESTful endpoints) and bringing back the food (data) to you.
Full Stack Integration Code with Flask
This Flask code integrates with the JavaScript code presented above. Note that this code alone won’t function without the chatbot logic for query handling and response generation. It’s just a sample code to help you get started.
Before getting started, make sure to install Flask in your terminal:
pip install Flask
Then, create a Flask application in app.py:
from flask import Flask, request, jsonify, render_template
from typing import Dict, Any
import logging

app = Flask(__name__)

@app.route('/')
def index() -> str:
    """
    Render the index HTML page.

    Args:
        None

    Returns:
        str: Rendered index HTML page.
    """
    return render_template('index.html')

@app.route('/query', methods=['POST'])
def query() -> Dict[str, Any]:
    """
    Process user query and return the response.

    Args:
        None (expects JSON payload with 'user_query' key).

    Returns:
        Dict[str, Any]: JSON response containing status, message, and response text.

    Raises:
        ValueError: If no user query is provided.
        Exception: If any other error occurs during query processing.
    """
    try:
        user_query: str = request.json.get('user_query')
        if not user_query:
            return jsonify({"status": "error", "message": "No user query provided."}), 400

        logging.info(f"Received user query: {user_query}")

        # Assuming prompt_template and query_engine are defined elsewhere
        prompt: str = prompt_template.format(query_str=user_query)
        response = query_engine.query(prompt)

        # Check response attributes
        logging.info(f"Response object: {response}")

        # Handle the response text
        response_text: str = getattr(response, 'response', None) or str(response)
        logging.info(f"Query response: {response_text}")

        return jsonify({
            "status": "success",
            "message": "Query processed",
            "response": response_text
        })
    except Exception as e:
        logging.error(f"Error during query: {e}")
        return jsonify({"status": "error", "message": str(e)}), 500

if __name__ == '__main__':
    app.run(debug=True)
This code creates a responsive and maintainable backend. It sets up routes for rendering the main page and processing user queries. This ensures clear separation of concerns. Type annotations and extensive logging are implemented to improve code clarity and facilitate debugging. The app employs error handling to provide error information and appropriate HTTP status codes. JSON is used for efficient data exchange between frontend and backend. Similar to dictionaries, JSON offers an average time complexity of O(1) for key-value access, making it the fastest option for this purpose.
Remember to define the prompt_template and query_engine. This version of app.py is designed for an LLM-integrated chatbot, where you need a prompt template to guide the LLM and a query engine to handle information retrieval.
Assuming the chatbot logic is defined and set up successfully, start the local server by running app.py manually or executing the following command :
python app.py
Once the server is running, access the chatbot by navigating to the local host server in the web browser.
Step 8: Test the Chatbot
It is crucial to test your chatbot thoroughly. Testing is not a fixed step at number 8; it should be an ongoing process carried out continuously as you code, especially when adding new features. Testing ensures the system works correctly, efficiently, and provides a smooth UX. We can start with functional testing, which ensures that all features work as intended, from basic message sending and receiving to more complex functionalities like reset history and light/dark mode toggles. Usability testing is also important to make sure the interface is intuitive, accessible, and provides immediate feedback to user interactions.
Latency is extremely important for a good UX. Hence, performance testing should be a priority. Speaking about chatbot applications, if your chatbot is non-AI, the response generation should be less than 1 second. For AI chatbots, the response generation should be less than 1 minute since LLMs take time to generate tokens.
Ensure all responses generated are within the expected range. You can consider writing test cases for non-AI chatbots’ outputs, although this is often tedious and unnecessary since the output is predictable based on the fixed rule definitions. However, it is different for AI chatbots. The output of an AI chatbot is stochastic and harder to predict. If the LLM provider company decides to update its model, the generated output might change as well. Ensuring the output of an AI chatbot is completely reliable is currently an unsolved challenge. However, there are techniques to reduce hallucinations, such as using proper configuration, a good RAG setup, a high-quality database for the RAG, robust prompt engineering, a good LLM, and more. But nothing is guaranteed at the end of the day.
Integration testing is also essential to ensure that all components of the chatbot work seamlessly together. Regression testing is to confirm new updates do not break existing functionality. For more details on these testing methods, you can search for additional information online.
Step 9: Gather Feedback
Do not underestimate this step! It must be done carefully. You shouldn’t be putting too much effort into perfecting every feature or design before this stage. For the first MVP stage, stakeholders generally don’t care how much time you spend developing the chatbot; they mainly care about its core functionality and user experience. They usually aren’t aware of the fancy new frontend frameworks you used or the impressive design you implemented in the interface at a few glances. Trust me no one really cares, so don’t waste your time perfecting everything before demonstrating your first MVP. As mentioned in Step 2, you should let users navigate the product without instructions and observe how they manage. Do they stumble when trying to use a feature? Do they feel frustrated? Do they ask questions about how to use the product? Do they take too long to figure things out? All these observations will inform you whether your chatbot is intuitive and user-friendly.
You should gather feedback from a diverse group of people to make an informed conclusion. Don’t generalise the intuitiveness of your product based on feedback from only a few individuals. For example, older users might struggle with the chatbot interface at first compared to younger, more tech-savvy users. Also, consider getting a majority of the feedback according to your target audience demographics.
Never rush this step. In product development at startups and companies, one common failure is rushing through the feedback session, causing engineers to misunderstand or misprioritise what’s important. After user testing and observation, you can follow up with a few relevant questions to gather more feedback and insights.
In my opinion, the success of a product depends heavily on its UI/UX. Even if a company develops one of the best chatbots in terms of response generation quality, if the UI/UX is weak, it is hard to attract users and reach the potential user count. Humans are visual creatures, and many of us simply don’t bother to navigate a product if it’s not intuitive. The best UI/UX version of the product will strive a balance human psychology and technology.
Step 10: Optimise and Refine the Chatbot
Based on the feedback and insights received, you should improve your chatbot’s UI/UX and logic. Focus on reducing all the pain points users have faced previously. Make the usage as simple and intuitive as possible. To reiterate, don’t make users think when using it. The process from opening the chatbot application to finishing the conversation should be as easy as 1+1=2.
Optimisation wise, it is good to encapsulate code using classes or functions, essentially following OOP practices or modular design. Follow basic practices such as not repeating yourself, writing good and concise comments, writing readable and clean code, using readable variable names and docstrings, considering codes’ time and space complexities, and so on. These steps should be taken from the beginning, but you should continuously recheck to ensure the code is easy to track and maintain throughout the software engineering cycle, even after the product is deployed. There are still more advanced techniques, such as algorithm optimisation, which include optimising loops and recursive functions to reduce time complexity. It also includes using data structures, for example, using dictionaries instead of arrays for lookups can improve performance, as the time complexity for dictionaries is O(1), while for arrays it is O(n). Other than that, caching for memoization and reuse of results, parallel processing, and other techniques can further enhance code efficiency.
Security wise, it would be great to be aware of possible cyberattacks such as prompt injection, malicious prompts, cross-site scripting (XSS), and SQL injection. A lot of the security measures can be enhanced with good coding practices like incorporating input validation, error handling, cryptographic hashing using libraries like OpenSSL and implementing authentication before logging in. Especially if you or your company are planning to monetise the product, you should ensure it is security robust as you don’t want to lose money due to a few unethical black-hat parties. For large-scale projects in the industry, competent security teams are usually in place to advice these concerns.
Once optimisation or improvement is made, you should consider gathering feedback again. Steps 10 and 11 are ongoing processes that should be repeated until the chatbot is adequately refined for practical usage. Even after deployment, these steps should be done regularly due to the need for continuous updates, the emergence of new technologies, and the necessity to stay competitive.
Step 11: Deploy the Chatbot
Deploying a product for scalability for millions of users is a huge and critical task. I can’t give much insight into deployment at a production level, but for a toy project, there are a lot of free or low-cost hosting services available for deployment like Heroku, PythonAnywhere, or Netlify.
For scalability, server hosting can become much more expensive, depending on the service providers. This step is usually handled by experienced and skilled engineers and requires a good understanding of system design and architecture to ensure the chatbot can cater to millions of users.
Conclusion
To emphasise once again, this article is not a step-by-step tutorial to spoon feed you on how to build a chatbot. Rather, it aims to provide insights and ideas so that you can adapt, modify, and implement them in your context. Some of the insights discussed here can also be applied in other software engineering contexts.
I hope this article helps you in some way. Thanks for reading this far!